Updated March 2, 2022
In today’s blog I’ll be sharing the technical configuration steps required to use Microsoft AutoPilot with VMware Workspace ONE UEM (UEM) to achieve Microsoft Hybrid Domain Join (HDJ). If you do not own licensing for Microsoft AutoPilot you can achieve HDJ using an Active Directory Group Policy Object by following my previous blog found here.
The HDJ process through Microsoft AutoPilot involves a Windows device starting the Microsoft Out-Of-Box Experience (OOBE) with AutoPilot and then being redirected by AutoPilot to perform an Active Directory (AD) Domain Join using the Offline Domain Join (ODJ) process from Workspace ONE UEM. When ODJ completes, AutoPilot triggers a reboot to allow the Windows OS to apply the Offline blob, then AutoPilot continues registering the device with Azure. If you are not familiar with ODJ, I recommend reviewing my previous blog on the subject found by clicking here.
Before making a commitment to HDJ, understand that by default this is NOT a method that can be used if your computers are on a home network or the Internet at large when they start this process. This method assumes computers are on a corporate LAN with line-of-site to a Domain Controller for the entire onboarding process.
P.S. At the very bottom of this blog is a 30-minute video that walks through the configuration described below.
Pre-requisites:
- Need access to AD Users and Computers, ADSI Edit,
- Need admin access to Azure AD Connect,
- Need admin access to Azure AD (https://portal.azure.com)
- Need admin access to Microsoft Endpoint Manager Admin Console (https://endpoint.microsoft.com)
- Need admin access to Airwatch Cloud Connector (ACC) server
- Need admin access to VMware Workspace ONE UEM Console
- Need 1 or more test Windows 10/11 devices, prefer VM’s
Special Considerations:
The VMware Workspace ONE UEM Console uses an Organization Group (OG) for device management and configuration. It is a common practice in UEM to have a root OG and then to create multiple lower OGs to build out a hierarchy of configurations. Unlike the rest of the UEM Console feature sets, the Domain Join Configuration feature does not support multiple OGs. It does not support sub-OG’s either. All Domain Join Configuration must be configured at the top-most OG. Further, for Domain Join operations to function, the ACC installation and Directory configuration along with all of the UEM Console User accounts, the UEM Console Device Registration records, and all of the UEM Console domain configurations are required to exist at the root OG. While the device can always been moved to a sub-OG post enrollment and onboarding keep this in mind when trying to use this feature.
Step 1: Active Directory Configuration
The configuration starts in Active Directory.
To complete these steps you need access to Active Directory Users and Computers (ADUC). ADUC is installed by default on all Domain Controllers or the tool can be installed on a Windows desktop using the Microsoft RSAT installation files.
To join a domain on behalf of another device, an AD User Account is needed that has permissions to join computers to the domain using Delegated permissions. Create a new AD User account to use as the Delegated Permissions account as follows:
- Launch ADUC
- Navigate to yourDomainName.com > Users
- Right-click on Users.
- Choose New > User.
- Complete the New Object – User wizard. As an example in the screenshot below, I’ve named the account UEMDomainJoin with a complex password that does not expire and prevents the account from changing its own password.
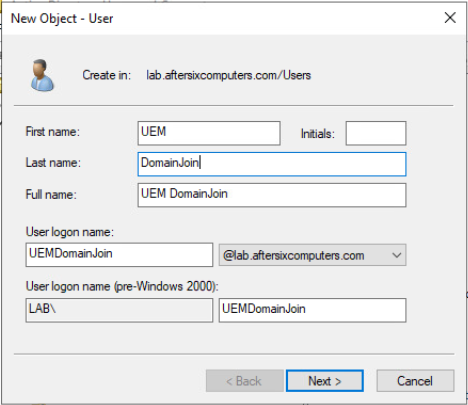
Note: The AD account does not need any admin roles in AD, a standard user account works for this purpose - When a new computer joins the domain it needs to be placed in an AD OU. By default this would be the “Computers” container; however the Workspace ONE UEM domain join process does not support the use of the “Computers” OU. It will be necessary to choose a different OU for this process, or create a new OU as follows:
- Create a new OU within ADUC. For example I use “UEMDomainJoin” as the name of the OU
- Within ADUC, navigate to the new OU created in the previous step, right-click on the OU name from the left-hand panel and choose Properties
- Choose the tab Attribute Editor
- Scroll down to distinguishedName, single-click it, and choose View to bring up the “String Attribute Editor. Copy and Paste the Value into Notepad for use later on. In my example the Value is OU=UEMDomainJoin,DC=lab,DC=aftersixcomputers,DC=com
- Close the String Attribute Editor and the Properties dialog box returning to the main ADUC navigation pane
- From the left-hand panel of ADUC right-click on the OU name, in my example UEMDomainJoin, and choose Delegate Control to launch the Delegation of Control Wizard
- Click Next
- Click Add
- Type in the name of the account that was created back in Step 5, in my example it’s the AD account named UEMDomainJoin.
And yes, I know I named both the account and the OU the same name. Sorry if that confuses you. - Choose Check Names to ensure it resolves.
- Choose Ok and the results should be similar to this:
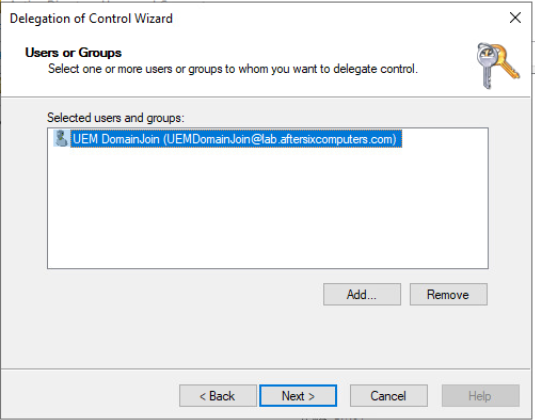
- Click Next to reach the Tasks To Delegate menu
- From the Tasks to Delegate menu, choose “Create a custom task to delegate” as shown below and click Next
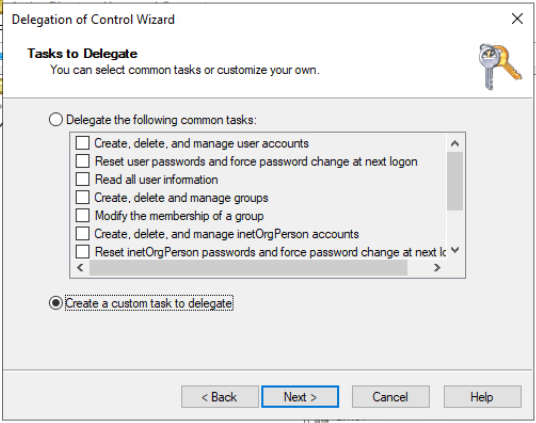
- Select “Only the following objects in the folder:”, select “Computer objects” and check the box for “Create selected objects in this folder.” The end result should look like this:
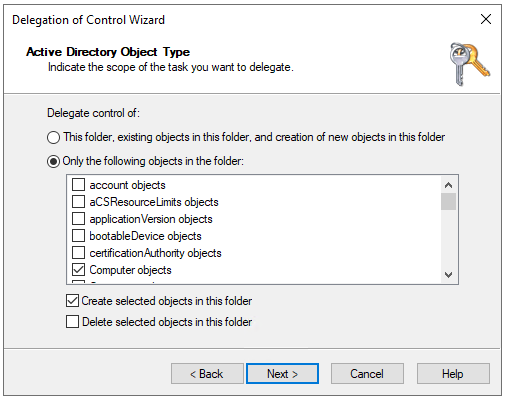
- Click Next to bring up the Delegation of Control Wizard Permissions menu
- From the Delegation of Control Wizard Permissions menu Show these permissions check the box next to General, and Creation/Deletion of the specific child objects then in the specific permissions check the box next to “Create All Child Objects.” The result should look like this:
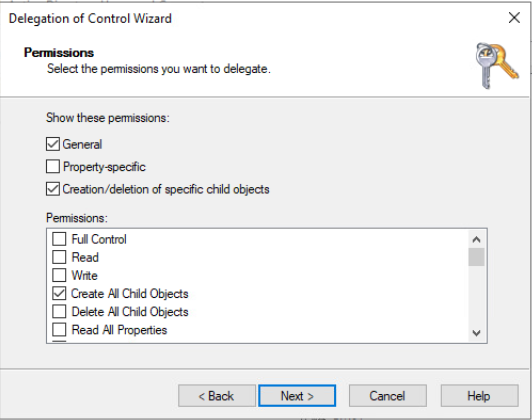
- Click Next to reach the end of the Delegation of Control Wizard and click Finish
- This step is optional:
If you need to use more than one AD OU to store computer objects in AD this is achieved by creating multiple Workspace ONE UEM Domain Configurations matching one OU to one Domain Join configuration. We have not covered the UEM Console portion of this, it’s later on in this blog, but while you are here in ADUC, if you do need to use more than one AD OU go ahead and repeat this process for each OU you need to use.
Step 2: Adjust AD MachineAccount Quota and AD GPO “Add Workspaces to Domain”
Microsoft Active Directory is designed to limit each AD user account to only being capable of 10 unique computer domain joins. Microsoft named this limit the “Machine Account Quota.” To work around the Machine Account Quota an IT Administrator could add the AD user account to be a member of the Domain Administrators Group but doing so introduces additional security risks and is not recommended. The configuration challenge with the “Machine Account Quota” is that this is set at the domain level for all accounts, it can not be raised or lowered for a specific user account. Unless you have less than 10 machines in your environment, the “Machine Account Quota” must be changed from the default value of “10” to the new value of “0” which means unlimited.
Let me repeat myself: Before making this change understand that making this change means ALL, I repeat ALL Active Directory User accounts that are not members of the Domain Administrators Group will now have unlimited domain joins available.
To prevent this undesirable security configuration, this means it is necessary to implement an additional AD GPO to limit the scope of this change. The AD GPO is named “Add Workspaces to Domain” which will change the default behavior of allowing every AD account to join a domain an unlimited amount of times and instead only allow specific accounts to be able to join the domain an unlimited amount of times.
Many organizations likely already have the “Add Workspaces to Domain” Group Policy enabled, but if you do not, this policy is found in the AD GPO Management console under:Computer Configuration > Policies > Windows Settings > Security Settings > Local Policies > User Rights Assignment
Here is what the GPO looks like:
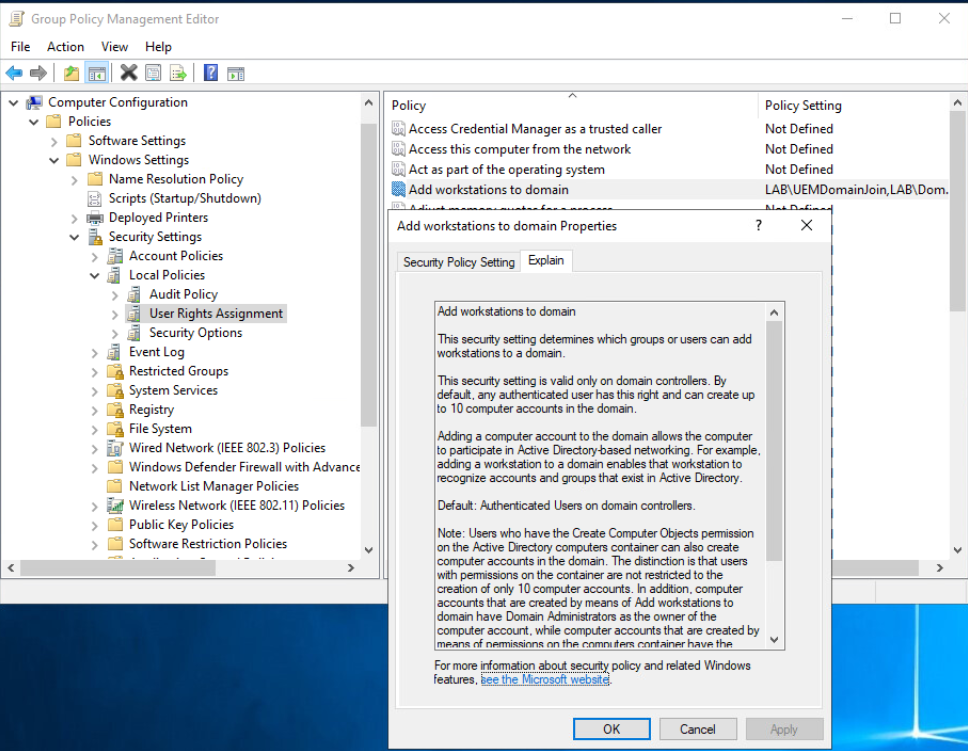
Microsoft’s Best Practice for AD is to create an AD Security Group then assign the “Add workstations to domain” GPO to the Security Group. In this way any users that get added to the Security Group will then be able to create computer objects in the domain. Readers may observe I do not follow this advice in the screenshot attached, but I do still recommend it.
The next step is to make the change to the MachineAccount Quota as follows:
- Comfortable with Powershell?
Change the MachineAccount Quota with:Set-ADDomain -Identity ((Get-ADDomain).distinguishedname) -Replace @{"ms-DS-MachineAccountQuota"="0"}
To validate that the command was successful:Get-ADDomain | Get-ADObject -Properties 'ms-DS-MachineAccountQuota' - Not comfortable with Powershell?
From the Windows Administrative Tools section, launch Active Directory Service Interfaces Editor (ADSI Edit) - Right-Click on the left menu named “ADSI Edit” and select Connect To then select OK to accept the default naming context. A new object will appear on the left hand menu with the name “Default naming context [name of your domain].”
- Expand the arrow to the left of the Default naming context to display a folder structure listing your domain and the LDAP structure beneath it.
- Right-click on the first folder which should read something like “DC=your,DC=domain,DC=com” and select Properties. It should look like this but with your domain information displayed:
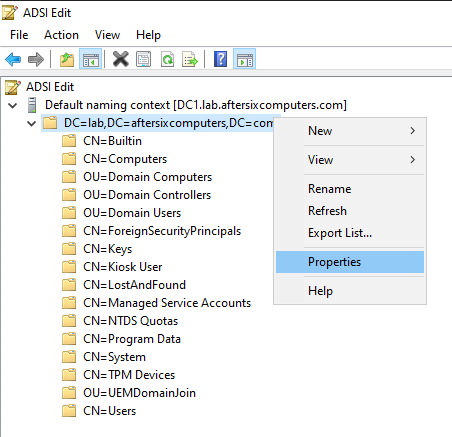
- From the Attribute Editor scroll down to ms-DS-MachineAccountQuota, choose Edit and change the value to 0.
- Save the changes and close ADSI Edit
Step 3: Microsoft Azure Admin Portal (https://portal.azure.com):
In this step we validate a few links between Microsoft Azure and Workspace ONE UEM and we create a new object in Azure.
- From the Azure Admin portal choose Azure Services > Azure Active Directory
- Under the Manage blade on the left hand navigation menu, select “Mobility (MDM and MAM).
- Confirm that the “Airwatch by VMware” app is listed here.
- Select the “Airwatch by VMware” app to bring up the configuration properties and confirm the Azure tenant is linked to your correct UEM Console server.
You would be surprised how many customers have more than one UEM console server and have mis-linked Azure and UEM.
Close the menus to get back to the main Azure Active Directory Overview navigation menu. - Next create a new AAD Group to assign the AutoPilot computer objects to:
- Under the Manage blade on the left hand navigation menu select Groups
- Select New Group
- Leaving the Group type as Security, choose a Group Name. In my example I named the group HybridJoin_devices so that it is abundantly clear exactly what this group is for.
- Choose Create at the bottom of the menu
- We are finished with the Azure Portal configuration.
Step 4: Workspace ONE UEM Component Configuration
This step involves all of the configuration changes to the Airwatch Cloud Connector (ACC) configuration, setting up the Domain Configuration in the Workspace ONE UEM Console and adjusting a number of other settings within the Workspace ONE UEM Component Configurations. Let’s dig in:
- From your primary computer launch the Workspace ONE UEM Admin Console
- Validate the version of the UEM Console is 21.XX or higher which is the first branch of the UEM console that added support for domain join operations.
- Navigate to
Groups & Settings > All Settings > System > Enterprise Integration > Cloud Connector - Scroll down and choose Test Connection.
In the Test Connection Results, ensure the version of ACC is version 21.5.0.5 or higher. It should match the version of UEM. If the version is not 21.5.0.5 or higher, download the AirWatch Cloud Connector Installer .MSI, transfer the .MSI to your ACC server and run the .MSI to complete the upgrade. - Domain Join operations are not captured by the ACC logs unless Verbose Logging is enabled so the next step is to connect to the ACC Server and enable Verbose logging.
- On ACC Server right-click on the Start menu and choose Run.
- Type in services.msc and press Enter
- Find AirWatch Cloud Connector and stop the service
- Open Windows File Explorer
- Enable “File name extensions” by choosing the View tab and checking the box named “File name extensions”
- Navigate to C:\vmware\airwatch\cloud connector\bank1\
- Find the file CloudConnector.exe.config
If you do not see the file in the bank1 folder, change to the bank2 folder - For the next step Notepad.exe needs to be running as a local administrator so it has permissions to save the changes you are about to make.
- Open CloudConnector.exe.config using Notepad.exe and find the following line:
<loggingConfiguration filePath="..\..\Logs\CloudConnector\CloudConnector.log"
logFileRollSize="10240" maxArchivedFiles="20" tracingEnabled="false"
level="Information" />
Replace the word “Information” with “Verbose”
Replace tracingEnabled=”false” to tracingEnabled=”true” - Save the file and close Notepad.exe
- In Windows File Explorer make sure the file saved as
CloudConnector.exe.config.
(If you did something wrong you might end up with a second file named CloudConnector.exe.config.txt) - Back in the Windows Services MMC, start the AirWatch Cloud Connector service. Wait a few seconds to make sure the service starts, and stays running.
Note: If the ACC service does not remain running, it means you messed up the edits. Recheck your work and try again. - To confirm the verbose logging changes worked, open
C:\VMware\AirWatch\Logs\CloudConnector\CloudConnector.log.
Scroll to the bottom of the file and in the fifth column you should now start to see the word “Debug” and/or “Trace” - Go back to the Windows Services .MSC and stop the AirWatch Cloud Connector Service
- There are 3 more changes to make on the ACC in order to enable the Domain Join:
- Add the account UEMDomainJoin to the local Administrators Group:
- Right-click on the Windows Start Menu
- Choose Computer Management
- Expand System Tools > Local Users and Groups > Groups > Administrators
- Click Add
- Type in yourdomain\UEMDomainJoin
- Choose Check Names
- Click OK
- Adjust the NTFS permissions for the ACC folder
- Open Windows File Explorer
- Navigate to C:\VMware\AirWatch\CloudConnector
- Right-click on the folder and choose Security tab,
- Choose Advanced
- Choose Change Permissions
- Choose Add
- Select a Principal:
- Choose UEMDomainJoin
- Under Basic Permissions check the box next to WRITE as indicated in the screenshot below:
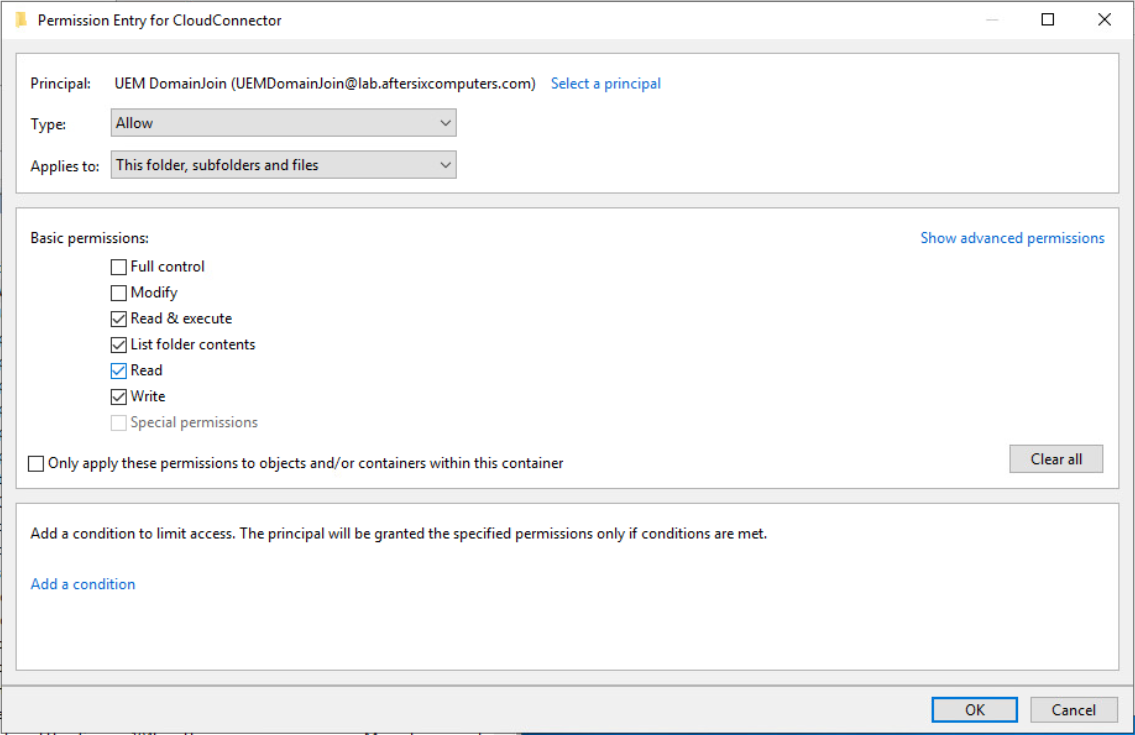
Note: Further testing with customers have shown that in some AD environments this account also needs the Modify permission. Try it without and if things fail adding Modify might be a good troubleshooting step
- When ACC is installed, it runs as the Local System Account but the local system account does not have rights to create computer objects in AD so the ACC service must run as the user account that was created at the beginning of this blog which has been delegated access to create computer objects. In my example the account is UEMDomainJoin
- From the Windows Services.MSC right-click on the Airwatch Cloud Connector Service Name
- Choose Properties
- Choose the Log On tab
- Choose “This Account,” choose Browse, add the account UEMDomainJoin
- Supply the password for the account
- Choose OK.
If everything worked the following message will popup:
- Start the ACC Service
- Open C:\VMware\AirWatch\Logs\CloudConnector\CloudConnector.log and check for any errors on launch
- This concludes the configuration changes necessary to the ACC for domain join operations to succeed.
- Add the account UEMDomainJoin to the local Administrators Group:
- Launch the Workspace ONE UEM Console and navigate to
Groups & Settings > All Settings > System > Enterprise Integration > Directory Services - Below the Bind Authentication Type setting on this page is the Domain and Server field as seen in the photo below:
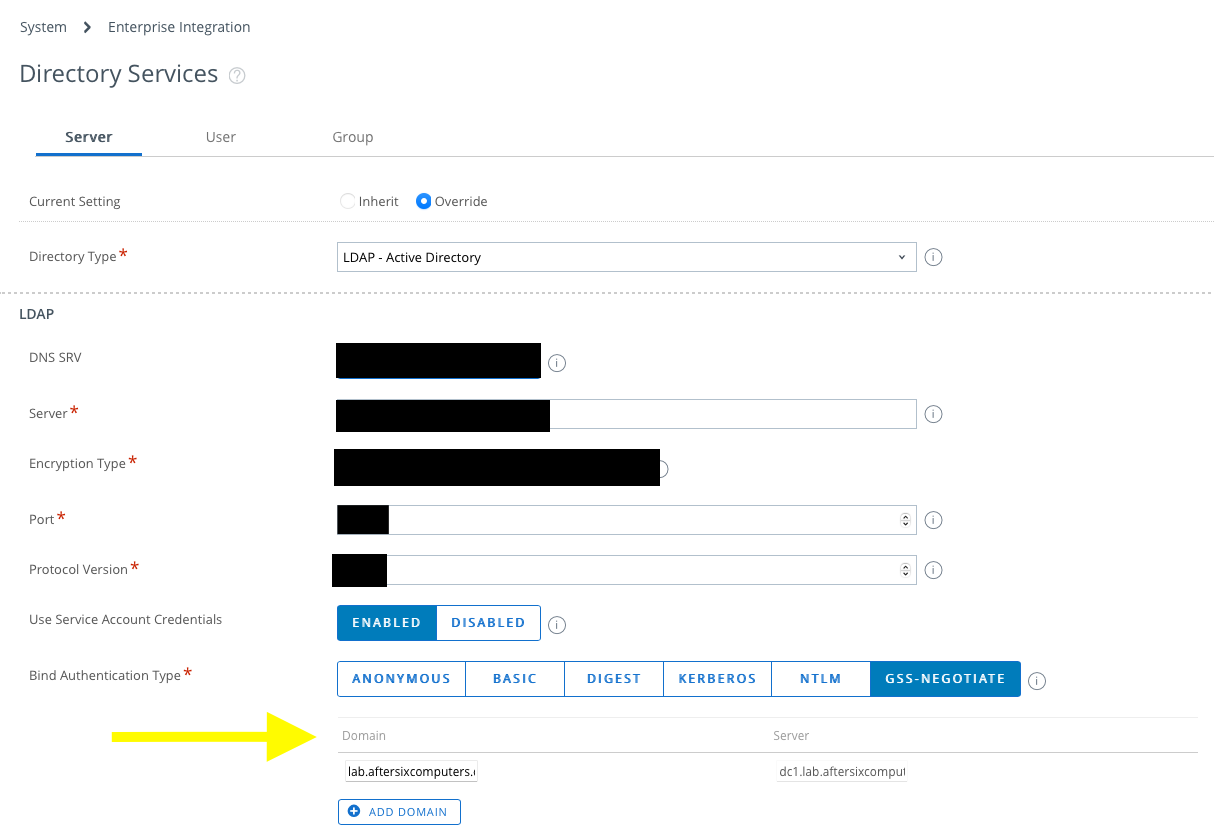
Take a look at the value in the Domain field. The value listed here is the name that will be used by the ODJ process join the domain. - The next step is to create a new UEM Device Tag that will be used in conjunction with a Smart Group that will ultimately link new computers to the Domain Join Configuration. To create the tag:
- Navigate to
Groups & Settings > All Settings > Devices & Users > Advanced > Tags - Choose Create Tag and give the Tag a name.
In my example I named the tag ODJ
- Navigate to
- Next create a Smart Group based on the tag
- Navigate to
Groups & Settings > Groups > Assignment Groups - Choose Add Smart Group
Choose a Name that indicates this Assignment group will be used for Domain Join Operations - For the Type, use Criteria and under Tags, add the Tag created in Step 9. In my example the tag is ODJ
- Navigate to
- Now it’s time to configure the UEM Console Domain Join Configuration as follows:
- Navigate to
Groups & Settings > Configurations - Search for “Domain Join” and select it from the results
- Choose Add
- Name: This will be the NetBIOS name of the domain defined from the Directory Services Setting
- Domain Join Type: Currently limited to On-Premises Active Directory
- Domain Name: Pre-populated from the ACC configuration
- Domain Friendly Name: Pre-populated from the ACC configuration
- Machine Name Format: hover on the information circle to see what options you have for naming the computer. As an example I use
AS%RAND:8%
Pro Tip: Virtual Machines often use special characters when generating Windows serial numbers. If you define Serial Number for the machine name, and your VM has a special character in the serial number, the domain join will fail with the error that the DNS name contains invalid characters.
The end result should look similar to this:
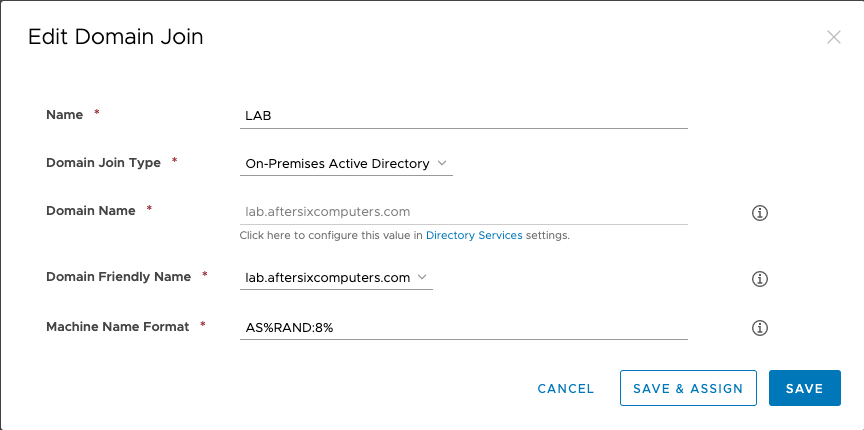
- Choose Save And Assign
- Similar to the previous dialog, complete the following:
- Name: pre-populated
- Domain Join Type: pre-populated
- Assignment Name: Type in a name that makes sense to you. In my example I use “Drop Ship”
- Organization Units: In this blog back in Step 1.6.4 you copied the DN name from ADSI of the OU where the computers will join the domain. Copy and paste it here.
Note: In the latest edition of the UEM Console this field has been enhanced to allow searching for a common name which will then resolve to the full DN. - Assignment Groups: Type in the name of the SmartGroup created in Step 10.
The end result should look similar to this: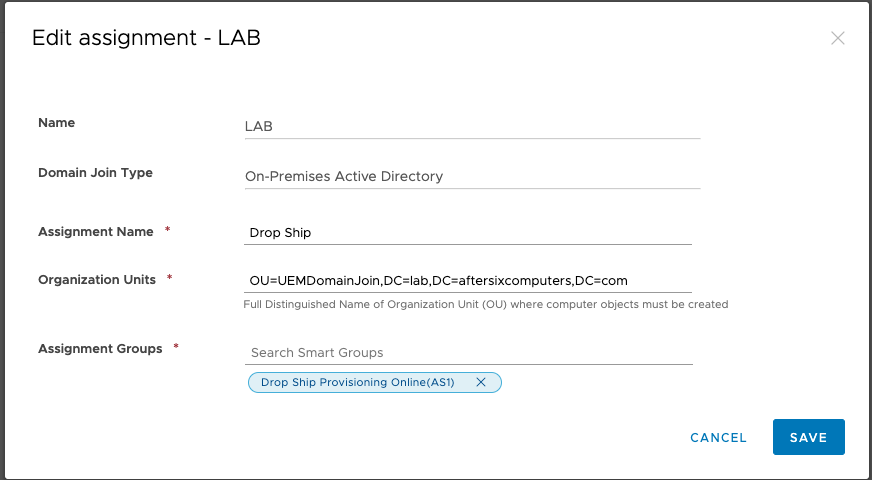
- Choose Save
- Navigate to
- The next step is to Pre-Register the Windows device in the UEM Console by completing the following steps:
- Navigate to
Devices > Lifecycle > Enrollment Status > - Choose Add > Register device
- Under the User section type in the username of the person that will receive the Windows device. DO NOT use a staging account
- Under the Device > Platform choose Windows Desktop
- Under the Messaging section choose Message Type NONE
- At the top of the page select the Tags tab, choose Add and select the Tag created in Step 9 above. In my example that is ODJ
- Save the registration record
- Navigate to
- There is one last change to the UEM console that is necessary due to a bug:
- Navigate to
Groups & Settings > All Settings > Devices & Users > General > Enrollment - Select the Optional Prompt tab
- Scroll down to the Windows section and set “Enable the Status Tracking Page for OOBE” to DISABLED.
- Navigate to
Step 5: Microsoft AutoPilot profile configuration using Microsoft Endpoint Manager Admin Console (http://endpoint.microsoft.com)
- Launch the Microsoft Endpoint Manager Admin Console
- From the navigation blade on the left-hand side, select Devices
- From the devices overview find the “By Platform” section and choose Windows
- In the middle navigation pane choose Windows Enrollment
You should end up at a menu that looks like this: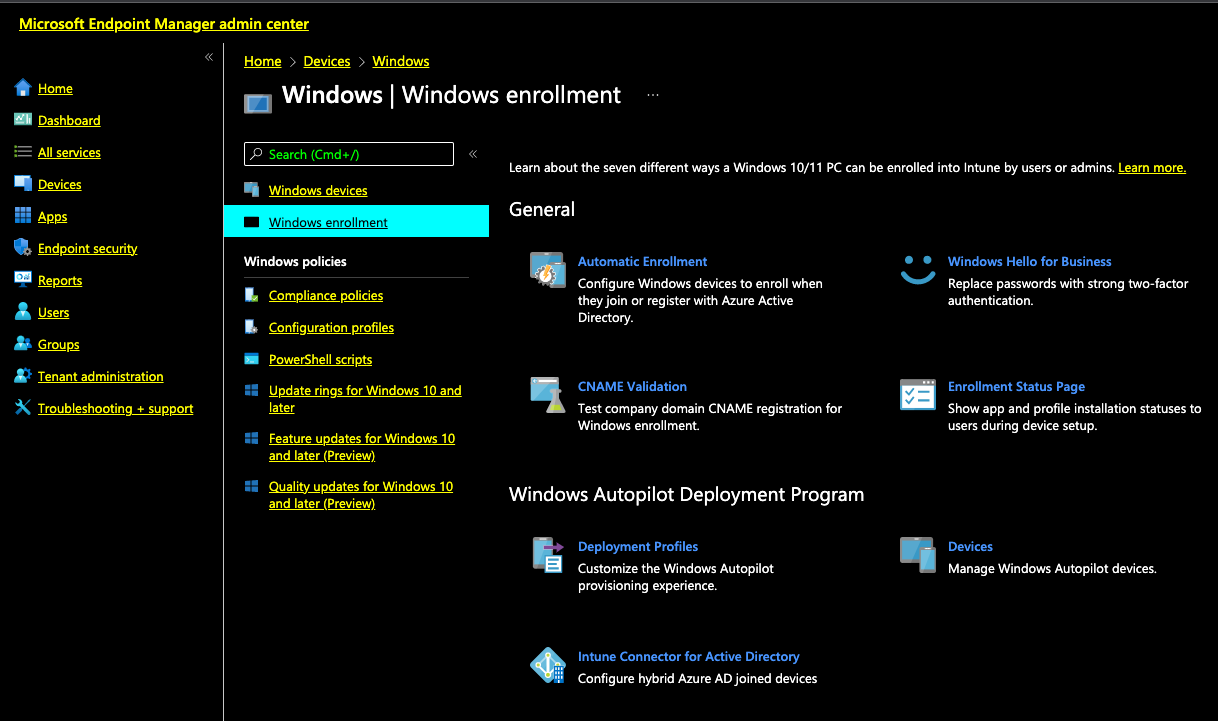
- On the right-hand portion of this menu find the “Windows AutoPilot Deployment Program” and select “Deployment Profiles”
- Choose Create Profile > Windows PC
Note: Microsoft does not allow editing of the AutoPilot profiles once they are created so think carefully about the options you want before you save the profile.- On Step 1 of 4 give the profile a name. In my example I use AfterSix Hybrid and left the rest of the options at the default. Choose Next
- On Step 2 of 4 configure OOBE as follows:
- Deployment-mode should be User-Driven
- Join to Azure AD as should be HYBRID Azure AD joined.
- User account type should be Standard
- Allow pre-provisioned deployment should be No
- Apply device name template should be No
- On Step 3 of 4 Assign the AutoPilot Profile to the Microsoft Azure User Group previously created. In my example this is the group DSP
- On Step 4 of 4 Save the changes
- The next step is to register a device with AutoPilot and then assign the device via Serial Number to the DSP group but before this can be done it’s necessary to move to the Windows test device.
Step 6: Register a Windows test device with AutoPilot
Microsoft AutoPilot requires manual device registration. Grab your test Windows device where the Windows OS is already installed and complete the following:
- Boot the computer into the Out-of-Box-Experience (OOBE).
- From the blue OOBE “Login to Microsoft screen”, bring up the Command Prompt by pressing
- Ctrl + F10 (or Shift+F10 for HyperV)
- From the Command Prompt type in
powershelland press enter to launch Powershell - From powershell run the following commands, pressing Enter after each line:
Set-ExecutionPolicy UnrestrictedInstall-Script Get-WindowsAutoPilotInfo -ForceGet-WindowsAutoPilotInfo.ps1 -online
A prompt will appear asking for an admin login to the Intune/ MEM Admin Console. If the account supplied is missing the permissions to register new devices in Azure, the registration process will fail. - Be patient. The device registration process is subject to Microsoft Azure service availability voodoo. Sometimes it works in a few seconds, sometimes it takes several minutes. Some days it doesn’t work at all but works fine the next day. Be patient.
- When the registration is successful copy the Serial Number to Notepad.exe
- Power Off the Windows 10/11 test device using the command
shutdown /s
Note: Testing shows that if you try and continue OOBE without powering off the device it will not pick up the AutoPilot profile and fail miserably.
Step 7: Assign the Device an AutoPilot Profile
With a device now registered with AutoPilot the next step is to link the device registration to the AutoPilot Profile that was created back in Step 5 by assigning the computer to the AAD Group. The association is done using Microsoft Endpoint Manager’s Administrative Console.
- Launch the Microsoft Endpoint Manager Admin Console (http://endpoint.microsoft.com/)
- From the navigation blade on the left-hand side, select Groups
- From the right-hand menu select the User Group that you assigned the AutoPilot profile to, in my example it’s the User Group named DSP
- From the Group details page choose Members
- Choose Add Members
- In the Search dialog box, use the device serial number recorded from Step 6 to add the computer to the group
- Navigate back to the Windows Autopilot Deployment Program page via Home > Devices > Device Enrollment Enroll Devices > Windows Autopilot Deployment Program and choose Devices
- The computer registered in Step 6 should now be visible in the list. In the 5th column named “Profile Status” look for the word “Assigned” to confirm that the computer has been assigned an AutoPilot Profile.
Note that Endpoint Manager may take a few minutes to assign the AutoPilot Profile to the device. In testing we’ve seen device assignment take 1 minute, we’ve seen it take 30 minutes. Be patient!!!! Do not proceed until this is completed, indicated by the “Profile Status” changing to Assigned.
If you just can’t bring yourself to be patient you can try logging into https://businessstore.microsoft.com and assign the AutoPilot profile there as well. The Microsoft Business Store Portal is the original home of AutoPilot; however Microsoft is retiring this portal in the not-to-distant future.
Step 8: Turn on the Windows device and watch the magic
Congratulations on completing all of the configuration associated with this process. At this point you can head back to the test device you powered off previously and power it back on and watch it works its magic. If you configured everything properly the end result will be a Windows device that has joined AD and AAD and you’ll be sitting at a Windows login prompt ready to go.
If something broke, take a look at my troubleshooting blog
Step 9 (Optional): Microsoft AD Connect
The overall workflow being described in this blog is for brand new computers which means they will be provisioned for Hybrid Domain Join using Microsoft AutoPilot. If you also require a solution to enable Hybrid Domain Join for devices that DO NOT flow through AutoPilot, I previously blogged about how to achieve this using the Microsoft AD Connect tool. You can find that blog here.
Bonus: What if ACC is installed on an AD Domain Controller?
It goes against all Microsoft Best Practices to have a Domain Controller be anything other than a Domain Controller or a DNS server but if you find yourself in a scenario where you need this to work, the video below walks through the same configuration as above with one very important variation: the ACC is installed on the same server as the AD Domain Controller. There are some additional configuration steps required if you are in this scenario. While I personally never recommend this approach, it can work. To set this up with the ACC being installed on a Domain Controller, below is a 30-minute video, recorded by a co-worker, that shows you what you need to do:
