Last Updated April 26, 2023
The VMware Workspace ONE Tunnel app supports two methods of virtual private networking: per-device or per-app. When the Tunnel app is operating in per-device mode the VPN connects the operating system and every application and service on the device back to the corporate network.
Per-device VPN is what most VPN apps have been doing since the technology was invented. The risk with per-device VPN is that if a bad actor gains access to the laptop they have full access to all of the apps and all of the the corporate network.
Per-app VPN’s allow individual applications to VPN without requiring the entire device to connect back to the corporate network. If you are following zero-trust security principals where you want to provide the least amount of access to the corporate network as possible, per-app VPN continues to be the recommended approach.
The purpose of this blog is to demonstrate the 5 steps necessary to configure per-app VPN to allow Windows Active Directory joined machines to have line-of-site to the Domain Controller when using Per-App VPN Mode.
Special Note: The process described below is NOT intended to be used to join a computer to a domain. The domain join operations should already be completed.
Pre-requisistes required:
- Microsoft Active Directory Domain Controller (AD)
- Access to edit internal and external DNS records
- Workspace ONE UEM Console version 2102 or higher (UEM)
- VMware Unified Access Gateway Appliance (UAG)
- VMware Tunnel for Windows client
There are 5 parts to the setup. Follow them in the order defined below:
- Ensure UAG has an internet facing DNS name
- Configure Tunnel in UEM Console
- Enable Tunnel on Unified Access Gateway
- Deploy the Workspace ONE Tunnel app to devices
- Deploy a VPN Profile to devices via the UEM Console
The remainder of this blog covers the 5 steps in detail.
Part 1: Set up a public/external facing DNS name for UAG
When the Vmware Tunnel application launches it will create a VPN tunnel using the public/external DNS name defined in the Unified Access Gateway configuration. In my lab I use vpn.aftersixcomputers.com as that DNS name. Many people have asked exactly how this part gets configured. If you need that assistance keep reading. If you don’t need this assistance, skip to Part 2.
Disclaimer: I am not a networking guru. There are dozens of different ways to configure DNS so treat this as one example.
In my lab I use a pair of Microsoft AD integrated DNS Servers. I have configured two forward lookup zones:
aftersixcomputers.com
lab.aftersixcomputers.com
In the forward lookup zone aftersixcomputers.com I created a New Alias (CNAME) record named “vpn” that points back to the internal DNS name of the Unified Access Gateway. To configure the DNS records in your environment (using Windows Server 2022 as a guide) here are the steps:
- Login to a Windows Active Directory Domain Controller running DNS
- From the Windows Start Menu, on the right-hand pane of tiles, choose Windows Administrative Tools to launch the Control Panel > System and Security > Administrative Tools.
- Choose DNS to launch DNS Manager
- Expand Forward Lookup Zones
- In the existing Forward Lookup Zone create a new Host (A or AAA) record for the UAG and define the internal DNS name for the UAG and assign the UAG an internal IP address. Enable “Create associated pointer (PTR) record to create the Reverse Lookup Record
- If you need to, add a new Forward Lookup Zone by right-clicking on the Forward Lookup Zone and choose New Zone. For my lab this is where I defined aftersixcomputers.com.
- With the New Zone created, right-click on the zone and create a New Alias (CNAME) record
- Click on the Refresh icon at the top of the DNS manager and confirm both the forward lookup zone and reverse lookup zone were successfully created.
- At this point it’s a good idea to use nslookup from another device on the subnet and validate DNS resolution is working properly by doing a lookup of the records you just created.
The previous steps allow your internal devices to find the UAG via DNS but you now need a method for the Internet to find your UAG via DNS. My public DNS provider hosts the DNS records that redirect the Internet to my network. Preferably this process involves a static public IP address, maybe a proxy server, or load balancer, or some other network magic. In my lab I use a Ubiquiti UDM Pro (UDMP) at the edge. When I deployed the UDMP, the device did not support more than one public IP address but software updates from Ubiquiti now allow this, I have just not gone back and changed it, so at the moment I’m using port forwarding. For port forwarding to function I need to create a public DNS name and an A record that points the Internet to the UDMP’s WAN interface.
While your public DNS hosting providers process will vary, navigate to the hosting providers admin portal and find Advanced DNS settings and create a new A Record that matches the name you defined in your DNS forward lookup zone. For example mine is vpn.aftersixcomputers.com and for the IP address, use the public IP address of your edge router, in my case it’s the WAN IP address of the UDMP. The key point here is that the host name defined in the Public DNS entry will become the name used in the configuration of the Vmware Tunnel service.
With the public A record created, head over to your routers configuration page for port forwarding and setup port forwarding. By default VMware Tunnel uses Port 8443 for Per-App VPN and Port 2020 for Proxy so I have 2 port forward rules. The destination IPs would be the internal IP address you previously defined in your internal DNS for the UAG.
Note: VMware announced end of support for the Proxy functionality of Tunnel, so Port 2020 is not something I would recommend moving forward with.
The end result of this configuration is that a device on the Internet looking for vpn.aftersixcomputers.com is now able to reach the internal IP address of the UAG to establish the connection.
Part 2: Configure the Tunnel in the UEM Console
With the Public DNS name from Part 1 now available for use the next step is to configure the Tunnel using the Workspace ONE UEM Console.
- In UEM Console choose Groups and Settings > Configurations > Tunnel
- Create your Tunnel.
- Deployment Type = Basic (Cascade is supported just not in use in my example)
- Hostname = the public DNS name you defined with your hosting provider. In my case it’s vpn.aftersixcomputers.com
- Port = 8443
- Server Authentication = Airwatch SSL
- Client Authentication = Airwatch SSL
- Networking = Enabled with “Default AWCM + API traffic via Server Traffic Rules
- Logging = Disabled
- Custom Settings not configured
- Save the configuration
- While you’re in the UEM settings configure the Device Traffic Rule Sets that enable Windows domain joined devices to function as if they were on the corporate LAN:
- Under the Device Traffic Rule Sets choose Edit to bring up the “Manage Traffic Assignments”
- Select the Default Assignment to bring up the Device Traffic Rules menu
- Choose “Manage Applications”
- Add the following 5 Windows applications:
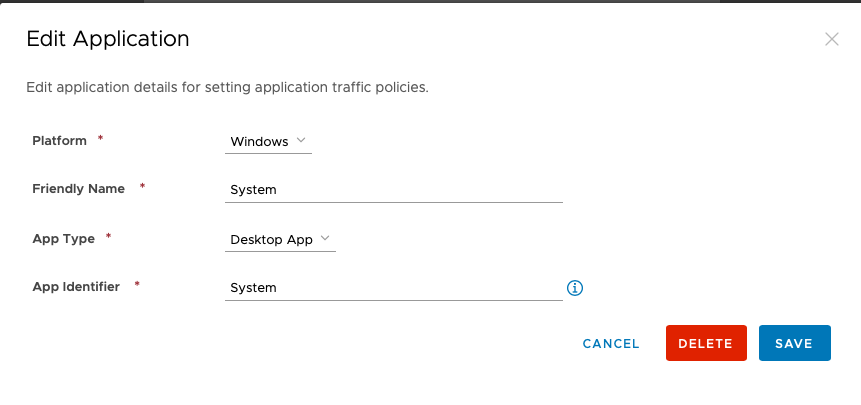
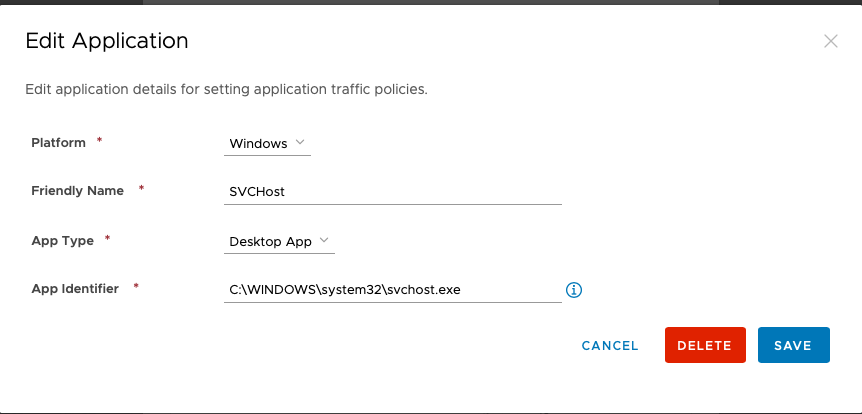
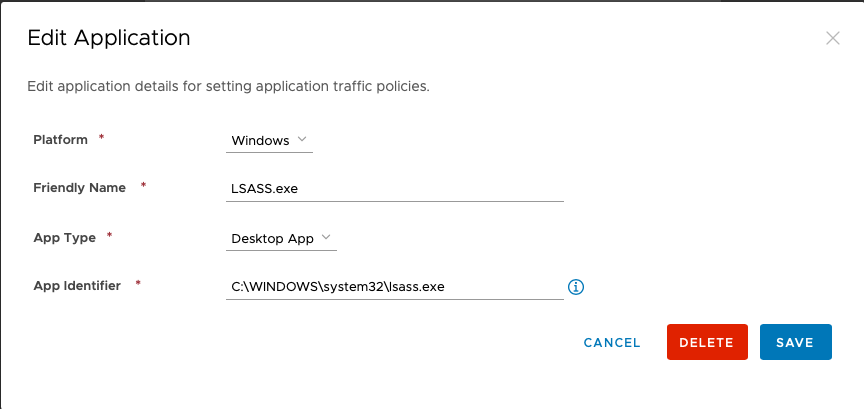
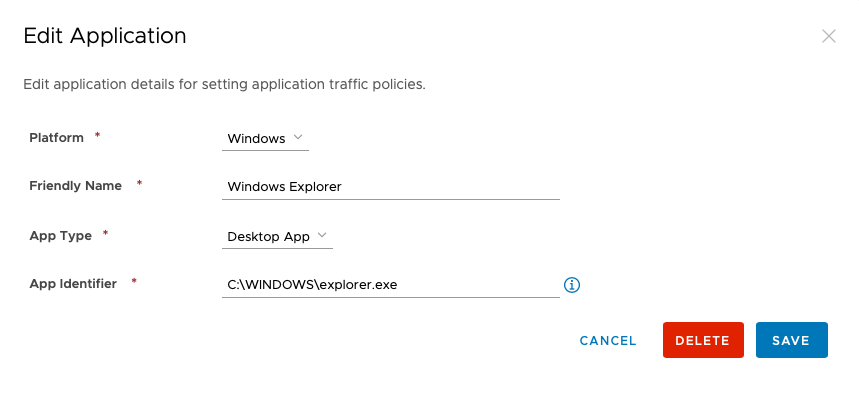
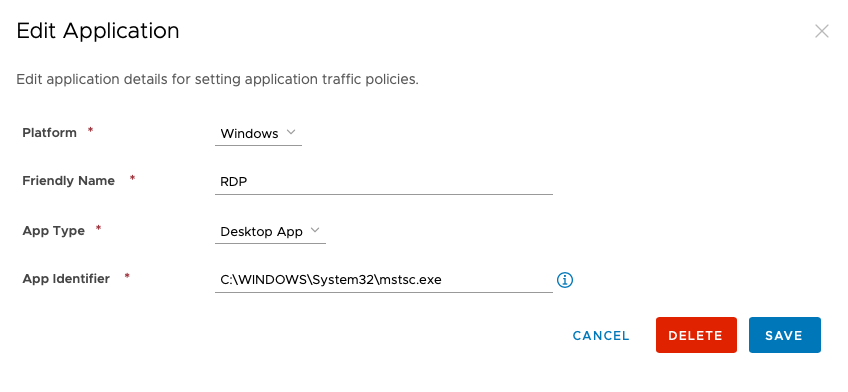
4. Now that the apps are created, from the Device Traffic Rules page choose Add Rule and add each of the apps to tunnel as illustrated below:
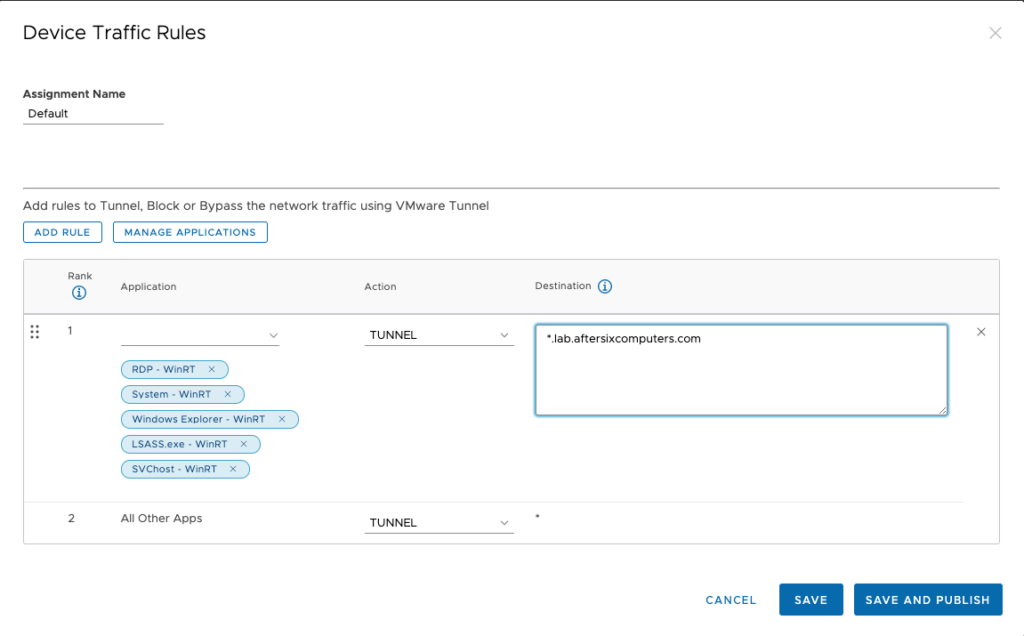
5. Define the domain name in the Destination. For example I’m using a wildcard of *.lab.aftersixcomputers.com
6. Choose Save and Publish
Part 3: Enable Unified Access Gateway Tunnel
The next step is to link the UAG to the UEM Tunnel configuration. This is done using the UAG Admin portal:
- Launch the UAG admin portal from your web browser by opening
https://yourUAGDNSname:9443/admin - Under General Settings > Edge Service Settings > click Show and then click the Gear icon under Tunnel Settings
- Choose Enable Tunnel Settings
- Define the API Server URL in the format
https://ASxxx.awmdm.com
where xxx equals the UEM Console url.
For example if UEM is https://CN135.awmdm.com use https://AS135.awmdm.com - The API Server username and password is any account on the UEM server that has been granted API access rights. By default the role “Console Administrator” has this permission. Note that what you type here must match the login format used for UEM. In my lab that means the username typed in here is
lab\bgarmon - The Org Group ID also comes from the UEM server, find it by hovering over the OG name in the UEM Console and use the value found in “Group ID”
- The Tunnel Server Hostname is the PUBLIC DNS name you defined at the ISP. In my example it’s vpn.aftersixcomputers.com
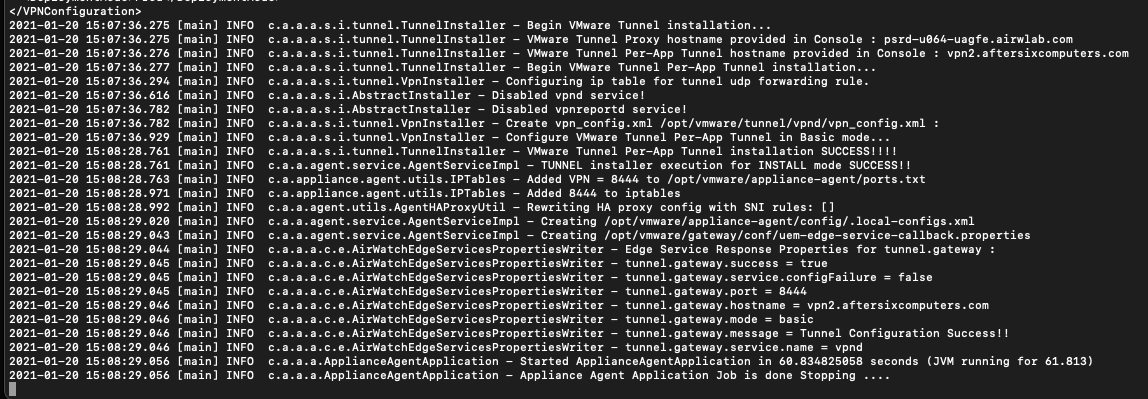
- BEFORE clicking SAVE, I recommend to SSH into the UAG and tail the log files to confirm what happens next succeeds. If you have a typo in your config you won’t really see any indication in the UAG admin portal that something didn’t work but you’ll spot it immediately in the SSH logs if you do the following:
- From your SSH client, SSH as root to the UAG
- Type in (but do not press enter):
tail -f /var/log/vmware/appliance-agent/appliance-agent.log
The reason you can’t hit enter yet is that this log file doesn’t exist until the first time the SAVE button is pressed in the Tunnel Settings page. - Make sure both SSH and Tunnel Settings page are visible on your screen at the same time. In the Tunnel Settings click SAVE and immediately switch to SSH and press enter to send the tail command. You should immediately see text scrolling in SSH. The screenshot below shows what you should be looking for to confirm success
- Flip back to the UAG General Settings page you should find a Green icon under the Edge Service Settings next to Tunnel.
- You’ve completed the UAG Tunnel Configuration. Next up are the Windows 10 device settings configuration.
Part 4: Deploy the Windows Tunnel client app from UEM
A brief history lesson to make sense of the different Tunnel versions for Windows:
- Versions 2.0 and below supports per-app VPN and MDM management
- Version 2.1 through Version 2.1.X supports per-app VPN, MDM management and per-device VPN
- Version 3.x is designed for stand alone uses cases where Workspace ONE UEM is not in use. This version supports per-app VPN and per-device VPN but NO MDM management – so don’t use this version for this configuration.
- Version 23.02 is released as a combination of 2.x and 3.x allowing both MDM and standalone using the same client.
Make sure your UEM Console is updated to 2102 or higher. The instructions below were tested against the Tunnel version 23.02 using Per-App Tunnel. Consult VMware’s production documentation if you will be leveraging the full device based tunnel configuration for any configuration changes that might be required.
Note: VMware continues to release minor updates to the Tunnel client application so you’ll need to adjust the meta-data in the instructions below to match the latest version of the client you download.
- Download the most recent 23.02 version of VMware Tunnel for Windows from https://My.workspaceone.com
- Browse https://images.google.com and download an app icon for Workspace One Tunnel to use later in this process.
- In the UEM Console choose Apps & Books > Applications > Native > choose Add Application > Upload
- On the Edit Application fill out the tabs as follows:
- Details tab: Name > Change this to VMware Tunnel for Windows
- Details tab: Supported Processor Architecture: 64-bit
- Details tab: App Version: 23.02
- Details tab: Current UEM Version 23.02 (this might read Version if you are on a UEM build prior to 21.01)
- Files tab: App Uninstall Process: Custom Script Type: Input
- Files tab: App Uninstall Process: Uninstall Command:
VMwareTunnelInstaller_23.02.exe /uninstall /Passive - Deployment Options tab: Install Context: Device
- Deployment Options tab: How to Install > Install Command:
VMwareTunnelInstaller_23.02 .exe /install /Passive /norestart - Deployment Options tab: Admin Privileges > YES
- Deployment Options tab: Device Restart: User engaged restart
- Deployment Options tab: Number of days after which device automatically reboots: 0
- Deployment Options tab: Retry Count: 3
- Deployment Options tab: Retry Interval: 1
- Deployment Options tab: Install Timeout: 5
- Deployment Options tab: Installer Reboot Exit Code: 3010
- Deployment Options tab: Installer Success Exit Code: 0
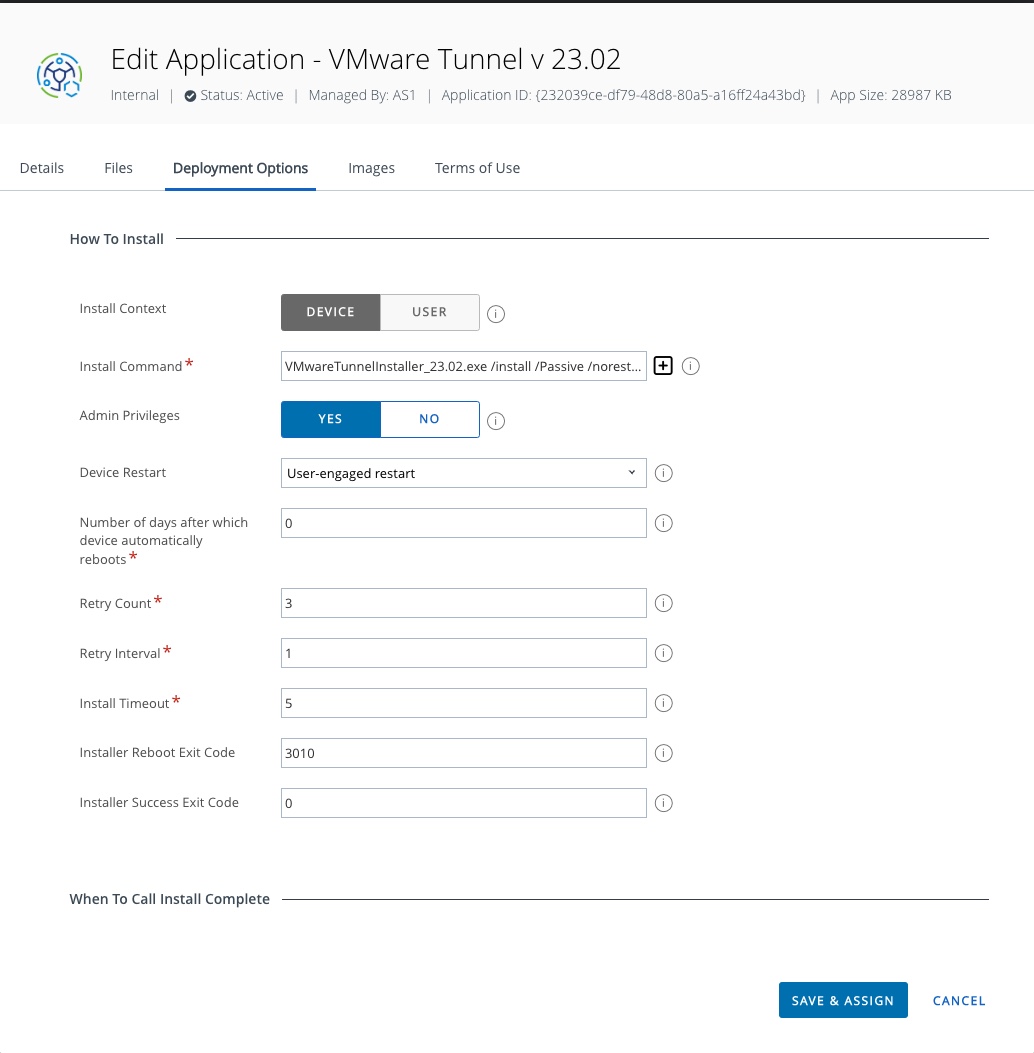
- Deployment Options tab: When To Call Install Complete: Choose Defining Criteria and select Add select Criteria Type File Exists with a path of
C:\Program Files\VMware\Workspace ONE Tunnel\VMwareTunnel.exe
Version 23.02 - Images Tab: Choose Icon Tab > Upload an image file for Tunnel app
- Choose Save & Assign
- In the Assignment Distribution menu give it a name like “Tunnel for Windows Default
- Choose an Assignment Group
- Change the App Delivery Method to Auto
- Choose the Restrictions menu on the left and enable “Make App MDM Managed if user installed”
- Enable “Desired State Management”
- Choose Create
- Choose Save
- Choose Publish
For more information about client deployment options for Tunnel, VMware is now publishing a comprehensive guide to rolling out Tunnel which can be found on VMware’s TechZone by clicking here. Leverage the TechZone article for the most recent updates to this process.
Part 5: Create UEM Console Profile for VPN
Note that beginning with Tunnel version 3.0 the UEM console now supports providing Configurations and Device Traffic Rules through Configurations and not profiles. The instructions below assume you are using Tunnel 23.02 and the current Profile configuration.
- In the UEM Console choose Devices > Profiles & Resources > Profiles
- Choose Add > Add Profiles > Windows > Windows Desktop > Device Profile
- Under General give the profile a name and assign it a SmartGroup
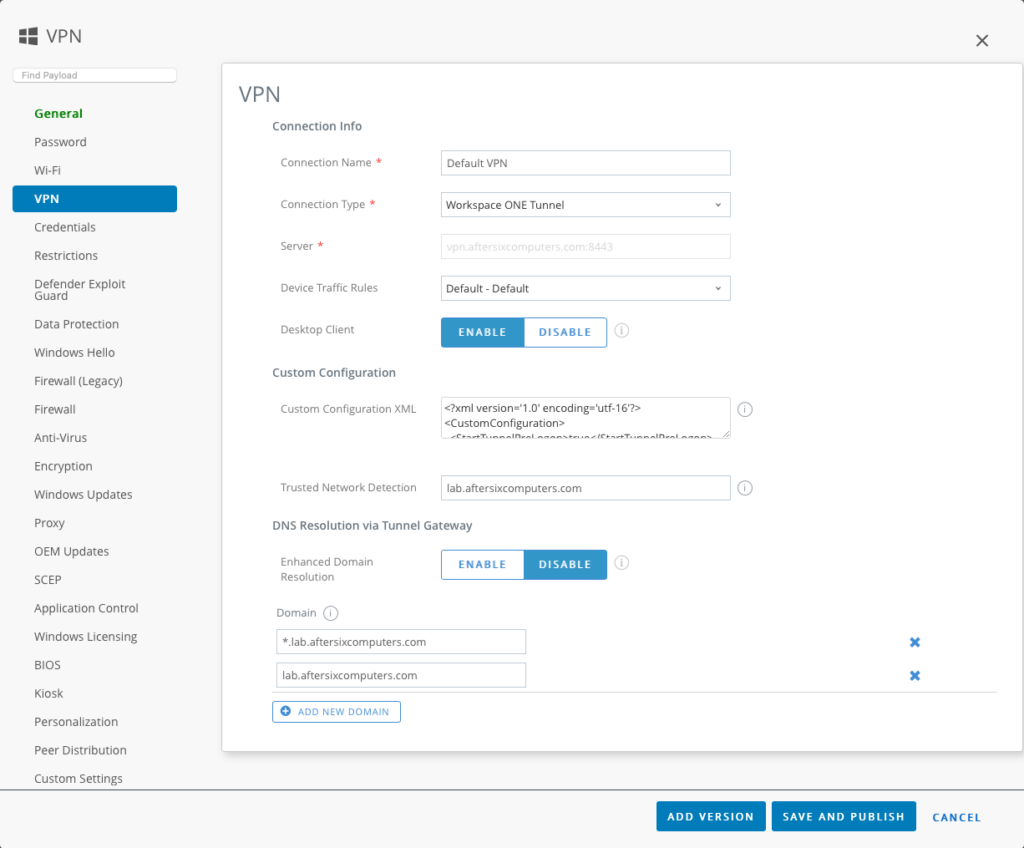
- Choose the VPN payload and fill out the following:
- Connection Name: It now defaults to “Default VPN”
- Connection Type: Workspace ONE Tunnel
- Device Traffic Rule Sets: Default – Default
- Under Custom Configuration XML add the following XML which is how the Tunnel is configured to launch before the Windows 10 Login screen appears:
<?xml version='1.0' encoding='utf-16'?>
<CustomConfiguration>
  <StartTunnelPreLogon>true</StartTunnelPreLogon>
</CustomConfiguration>
5. Configure the Trusted Network Detection to be the name of your domain. What this setting does is to ensure that when your device is on the trusted network, the Tunnel will not be established.
6. Under DNS Resolution via Tunnel Gateway you must define how DNS will be resolved. The end goal is to make Tunnel aware of when it will use the internal DNS servers. This area of the product has been enhanced in the latest UEM Console release so you now have two options to choose from: Enable Enhanced Domain Resolution, or Disable Enhanced Domain Resolution and define the Domains.
If you enable Enhanced Domain Resolution, Tunnel will read the Device Traffic Rules and use the Device Traffic Rules to define the domains. I suspect this may be a better method to use in production, but it’s a new setting I haven’t worked with much so experiment at will. In my example I set Enhanced Domain Resolution to Disabled and I’m defining *.lab.aftersixcomputers.com and lab.aftersixcomputers.com in the domain list.
The end result of your profile should look similar to this (taken from Workspace ONE UEM Console 2102):
Final Steps
Congratulations on completing the configuration. With this configuration in place Windows devices will be able to:
- Map Network Drives
- Establish RDP Sessions
- Apply Active Directory Group Policy updates
