
I spent a couple of days on the phone with Microsoft Azure technical support after I found myself in a computer disaster of my own doing: The two Domain Controllers that run my Active Directory (AD) Forest were deleted. No backups. I’d been down this road multiple times over the years and rebuilding AD is time consuming, but not technically difficult. Certainly not worth blogging about. Where it becomes difficult is when AD is synched via Azure AD Connect to a Federated Azure AD tenant and the Federated Azure AD tenant is using Workspace One UEM for authentication, made possible by a connector component that is installed on a domain joined Windows Server in the AD forest that was just deleted. Oh how the dominoes fall. I hope you never find yourself in this situation, but if you do, here’s the 7-step recovery process to fix it.
Step 1: Rebuild AD
You’re starting from scratch – make it count by going all in with Server 2019 and a Forest functional level of Server 2016 but keep the same domain name that you had before the disaster. Rebuild at least one Domain Controller, two would be better.
Re-create your OUs and Groups, but do not bother with user accounts at this stage. Your focus should be getting DNS, AD, Sites and Services and if you add a second DC, replication working.
Don’t forget to enable the AD Recycle Bin from the AD Admin Center (select your domain and under tasks look for the “Enable Recycle Bin”)
At some point you’ll need to rejoin all of the devices to the domain (this might very well be the most painful part of this process) but we’ll come back to that. For now, just get at least one Windows 10 device rejoined to the domain to verify basic domain functionality.
When you think you have everything working, run the following Powershell script using the Powershell ICE tool on your domain controller:
Start-Transcript
DCDIAG /v /c /d /e /s:FQDN_of_your_domain
Stop-Transcript
Make sure all is well with your brand new domain before moving to the next step.
Step 2. Install Azure AD Connect
This step sounds simple but it’s the most complicated step in the entire process. The end goal of this step is that the new AD forest needs to have user accounts that match the Azure AD user accounts if you want to reconnect to any of the previously working Microsoft services like OneDrive or Exchange. How you get there is the painful part.
The Microsoft Azure AD Connect app is what is used to to link AD to Azure AD but surprisingly this app is not an object sync tool; it’s an attribute sync tool. What does that mean? It means Azure AD Connect can not create new user accounts in AD. It can only create new objects in Azure AD. Once an object exists in Azure AD, the Azure AD Connect app will synchronize the objects attributes with AD. What the tool will NOT do is create AD accounts. We will have to do this manually, by using the process I’m about to describe. First though its critical to understand how the attribute sync works.
The magic that allows the Azure AD attribute sync to happen is something called a sourceAnchor. It’s also called an immutableID (aka you can’t change it). Each user account in AD has a sourceAnchor/immutableID and this is used to match the two objects. Having two names to refer to the same thing is maddening, but now you know they mean the same thing. By default the LDAP attribute mS-DS-ConsistencyGuid becomes the sourceAnchor/immutableID. In this scenario, each of the user accounts that are in Azure AD will already have a sourceAnchor/immutableID from the now destroyed AD environment and the local AD will not have any user accounts beyond the Administrator account you created as part of the rebuild. What you need is an AD account with the same sourceAnchor/immutableID from Azure. There are a few problems with creating a new account:
- If you create a new AD account you also end up creating a unique sourceAnchor/immutableID that will not match what is in Azure AD.
- Microsoft does not allow users to modify the Azure sourceAnchor/immutableID.
- The Azure AD Connect tool sees any new sourceAnchor/immutableIDs as a new object and duplicates them in Azure.
The good news here is that you can modify the local AD attributes. This is the key to how we’re going to solve this, but it requires a specific set of steps in order to function properly. To set this up for success we start by getting the Azure AD Connect tool installed.
Microsoft recommends the Azure AD Connect tool be installed on its own server and not on your domain controller. I will note that I had it working fine on my domain controller for a year with at least five version upgrades of the tool, but since you’re starting over anyway you may as well follow best practices and keep it on a separate server.
Use the MSI installer to complete the Azure AD Connect but do not run the initial setup wizard. On the local AD Domain Controller create a new OU named ExcludefromConnect. Now come back to the Azure AD Connect wizard modify the default OU synchronization behavior to EXCLUDE the ExcludfromConnect OU. We will make use of this later in the process.
With the Azure AD Connect tool installed and configured you should now move to a Windows 10 device, preferably one you’ve joined to the new AD.
Step 3 Get the sourceAnchor (Immutable ID) of the existing Azure AD User accounts and build matching AD accounts
From the Windows 10 device, install a couple of add-ons to Powershell to administer Azure. I recommend running all of these commands using the Powershell ICE tool (launched as an administrator).
Launch Powershell IC and run:
Set-ExecutionPolicy UnrestrictedNext run:
Install-Module MSOnlineNext run:
if ($PSVersionTable.PSEdition -eq 'Desktop' -and (Get-Module -Name AzureRM -ListAvailable)) {
    Write-Warning -Message ('Az module not installed. Having both the AzureRM and ' +
      'Az modules installed at the same time is not supported.')
} else {
    Install-Module -Name Az -AllowClobber -Scope CurrentUser
}
The next step is to connect to the Azure AD tenant, export the list of current users to CSV and pull the existing sourceAnchor/immutableId. Using Powershell ICE run the following:
Connect-MsolService
$onlineusers = Get-MsolUser -All | Select-Object UserprincipalName,ImmutableID,WhenCreated,LastDirSyncTime
$onlineusers | Export-Csv c:\temp\GetImmutableID.csv -NoTypeInformation
The end result is that you now have created the C:\temp\GetImmutableID.csv file which contains the user account details from Azure. We’ll be working with this file next.
Step 4: Create new AD accounts, sync with Azure AD, and then make some modifications
This is where it gets tedious. It’s a multiple step process that might not make a lot of sense as you walk through it, but it will make sense once you see it work.
Open the CSV file you exported in the previous step and look for the sourceAnchor/Immutable ID. Here’s an example of what this will look like.
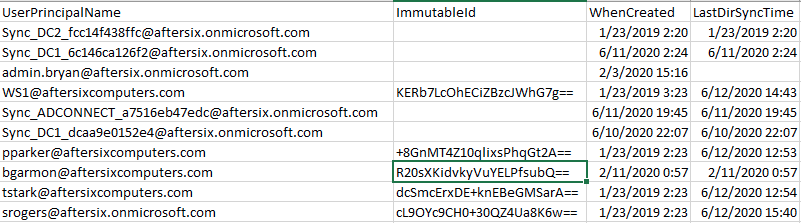
Before we continue there’s an important point in this screenshot above that needs to be called to your attention:
- The local AD in this environment is named lab.aftersixcomputers.com,
- The federated custom domain name in Azure is aftersixcomputers.com
- The Azure tenant is aftersix.onmicrosoft.com.
- All of my AD accounts use an alternate UserPrincipalName (UPN) suffix of aftersixcomputers.com. For example notice in the screenshot that pparker is @aftersixcomputers.com. Notice that srogers is not. Srogers is @afterisx.onmicrosoft.com. This is because at the time this screenshot was taken pparker had completed this process and properly synced. Srogers had not.
- The process we are about to follow below is going to create a new local AD account which is then duplicated in Azure, then removed from Azure, then modified in the local AD, and then re-synched to Azure. It’s a confusing process but you’ll see it working when you see the UPNs change from aftersix.onmicrosoft.com to aftersixcomputers.com (or whatever your UPNs are in your environment)
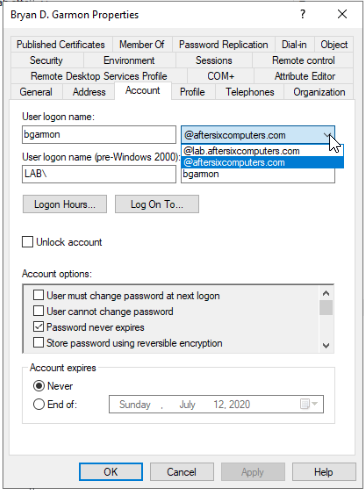
Note that if you haven’t previously set up Alternative UPN suffixes and you need to, the configuration is done on your Domain Controllers via Active Directory Domains and Trusts.
- Right-clicking on the top level name “Active Directory Domains and Trusts”
- Choose Properties.
- From here you’ll see the UPN suffixes. It will be blank unless you previously defined this. In my environment I add aftersixcomputers.com.
- Back in AD users and computers when selecting a user account and editing the properties you can now define the UPN as aftersixcomputers.com instead of the domain name which is lab.aftersixcomputers.com as seen in the screenshot below:
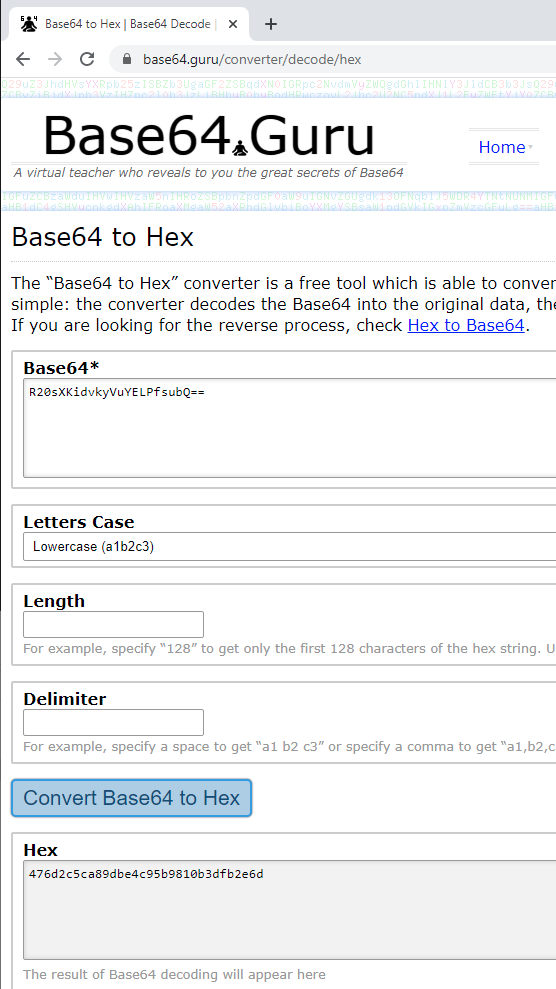
If this wasn’t already complex enough Microsoft added an additional complication. Azure AD uses base64 but AD uses Hex. The Immutable ID you see in the CSV file is in base64 so to use it for this process it must be converted from base64 to Hex.
Add a new column to the CSV file then run through this conversion process. There are a number of tools that do this. I found this website to be the most helpful: https://base64.guru/converter/decode/hex
With all of the user accounts now having an ImmutableID column with hex values, you are ready to continue.
Step 5: Create New AD Accounts and Trick Azure into merging accounts
The next step is to create a new local AD account for each UserPrincipalName in the CSV file. You can script this, but the end goal is that the local AD account must match the user’s first name, last name, user logon name and email address. With the new AD accounts created, we are going to now duplicate them in Azure which will seem odd at first but it’s the only way this process actually works.
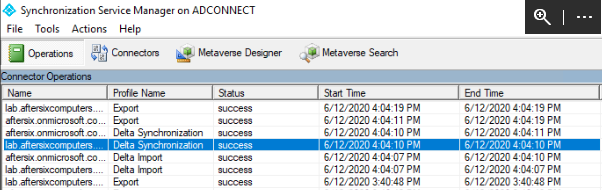
From the Azure AD Connect server, open Powershell as an admin and trigger an initial sync by running:
Start-ADSyncSyncCycle -PolicyType InitialOpen the Synchronization Service Manager and look under the Connector Operations section. You will see 4 entries indicating that the synchronization completed. You need to wait for all 4 to have a status of success before continuing as seen here:
On the Windows 10 device, login to portal.azure.com and launch Users > All User and you should now see duplicate records for each user account. What you should notice is that for the duplicate records, they will have different usernames. In my environment at this stage in the process I have pparker@aftersixcomputers.com and pparker@aftersix.onmicrosoft.com
Now that the duplicate records exist in Azure, come back to the AD Domain Controller and open AD Users and Computers. You will notice that you do NOT have duplicate records in the on prem AD. For each user account you created move it from the current OU to the OU we excluded from AD Connect – the one I suggested you name ExcludefromConnect.
Back on the Azure AD Connect server, trigger another full sync:
Start-ADSyncSyncCycle -PolicyType InitialOpen the Synchronization Service Manager and look under the Connector Operations section. You will see 4 entries indicating that the synchronization completed. You need to wait for all 4 to have a status of success before continuing.
Back on the Windows 10 device, in the portal.azure.com you should now see all of the duplicate records disappear because they are now excluded from Azure AD Connect. This may have seemed like a dumb exercise but the next few steps will fail if you didn’t do this. There’s more going on behind the scenes with this than Microsoft shared during our days of troubleshooting this.
Now back on he Domain Controller, AD Users and Computers under the ExcludefromConnect OU we’re now going to be making edits to each one of the accounts. I’m sure this could be scripted but I’m going to show you how to do this one account at a time.
Edit the user account and choose the Attribute Editor tab. The Attribute you are looking for is your sourceAnchor/immutableID which in my environment is the mS-DS-ConsistencyGuid.
Pro tip – you can start typing and the attribute editor will skip to the attribute you are typing. This is much faster than scrolling down to find this thing.
Here’s a screenshot of the value format and the value. Notice that the current value is in Hex and notice the fun spacing.
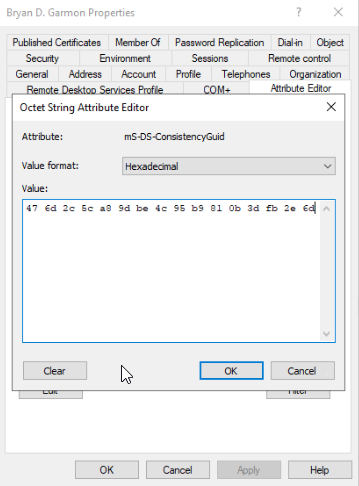
You mission, should you choose to accept it, is to copy and paste the Hex value from the CSV, replacing the one that already exists. I used Excel 2019 for editing and copying and pasting so your results may vary from mine, but I found it to be a royal PITA to get the paste part working properly. Yes you must get the spacing correct in the AD Attribute Editor. Yes it must all be a single line. I found the most consistent method was to first hit the Clear button at the bottom, then copy the non-spaced hex value from the CSV, then I just manually hit the space bar to do the separation. When you get this done and you choose OK, you’ll know you broke it if the resulting value box shows a bunch of random characters instead of the properly typed in hex values. And by random characters I mean the old school emojis/clipart type things. I forget what they are called – ASCII maybe? I don’t remember. Sorry, but the point is – if you see clipart/emojii/diamonds/circles/etc after you choose OK you’ve messed up and need to try again. I had to do this 29 times and at least 12 would simply never copy and paste properly so I had to manually type those in.
Now that you have completed this mind numbingly frustrating process, you should now have a bunch of user accounts that now match the sourceAnchor/Immutable ID that exists in Azure from the previously blown up AD environment.
Step 7: Move and Sync.
The next step is to move the AD user account out of the ExcludefromConnect OU and put them back in your main OU.
Back on the Azure AD Connect server, trigger another full sync:
Start-ADSyncSyncCycle -PolicyType Initial
Open the Synchronization Service Manager and look under the Connector Operations section. You will see 4 entries indicating that the synchronization completed. You need to wait for all 4 to have a status of success before continuing.
Back on the Windows 10 device, in the portal.azure.com refresh the all users page and you should now see that the existing Azure AD accounts change their domain name to reflect that the matching process between the AD and the Azure AD completed successfully.
At this point you have successfully re-linked AD accounts to Azure AD and you are now free to make any additional changes to the accounts. Note that if you need to adjust the UPN, do this from the AD size. I’ve found it best to make account modifications in AD, not Azure, then let Azure sync occur.
At this point the AD Connect services will run on a schedule, but after you make your additional changes you can speed this up by running a Delta sync:
Back on the Azure AD Connect server, trigger another full sync:
Start-ADSyncSyncCycle -PolicyType Delta
Congratulations – you now have a working AD with a synchronized set of user accounts!
Now go back everything up.
Closing Thoughts:
If you’re doing this as a Workspace One UEM user, I found that the ACC server survives being rejoined to the domain without a hiccup but the Workspace One UEM Identity Connector needed to be uninstalled and reinstalled before it would function again. I also found that Microsoft Auto Pilot was failing to register devices in Azure. To resolve this, I had to re-type in the Azure AD connection information in the UEM console and save what were not actually any changes, but hitting the save button triggered something to happen that resolved the issue.
As to Office 365, I found I needed to disable the Azure Federation and then re-establish it. I followed this guide from Okta.
With these steps in place I was back up and running and users had regained full access to O365.