
Organizations adopting BYOD for Apple iOS and Apple iPadOS devices face a number of challenges associated with Apple’s design philosophy that the end user is always in control, not the I.T. administrator. One area where this can be particularly painful is app installation and app configuration. Apple uses the term “manage” to describe installation and configuration changes to applications. Organizations need to “manage” apps in order to apply standard configurations and data loss prevention policies.
What is the problem?
BYOD devices will not have an Apple Supervision profile applied to them. The Supervision profile is what allows MDM vendors to push app installation and configuration changes to Apple devices WITHOUT user intervention. Unsupervised devices will always see one or both of the prompts below each time the MDM vendor attempts to install / update / modify an app. The problem is that End users often choose “Cancel” when presented with these messages leaving the app in an unmanaged state.
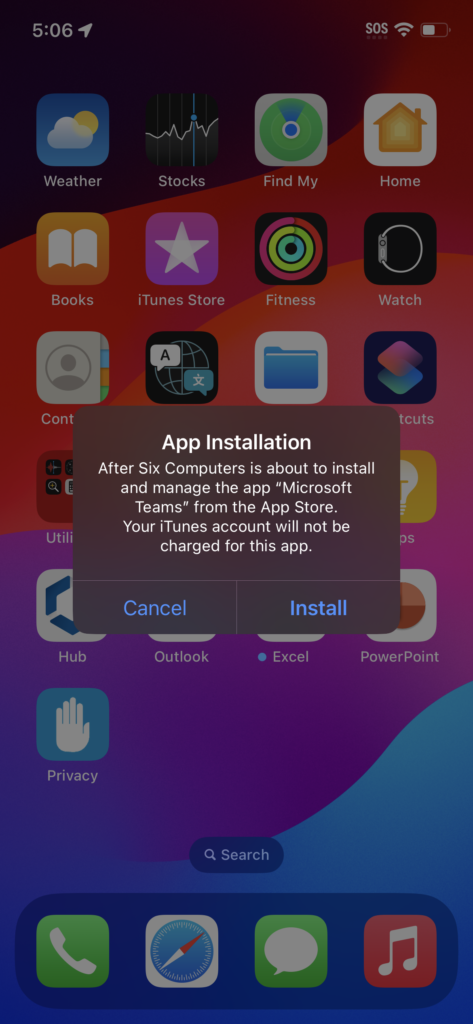

When a user chooses “Cancel” on either of these prompts the device returns an installation status of “Rejected” or “Management Rejected” and the device implements a 24-hour delay before the prompts are able to be displayed again. While there is no method available to force the prompts to appear during this 24-hour delay, MDM providers can trigger the prompts to appear after the 24-hour delay by initiating a device sync.
What can we do to fix this?
To be clear changing user behavior is an HR problem, not a technology problem. There is nothing we can do to stop a user from pressing the “Cancel” option each time these pop-ups appear. Apple allows these messages to pop-up indefinitely so it is possible a stubborn end user will never have their app managed. The problem for I.T. staff is that the Workspace ONE UEM (UEM) console does not surface unmanaged apps as being a problem in the environment. The solution discussed below encourages the user into choosing the correct option through the combination of a UEM compliance policy and device sync actions to trigger the app install prompts through Workspace ONE Intelligence (Intelligence) Freestyle Workflows.
Build a better carrot.
There are 6 components to this solution:
- Device Tags in UEM for each app
- Smart Group in UEM for unmanaged apps
- Device Compliance Policy in UEM
- Intelligence Freestyle Workflow to Tag Non-Managed Apps
- Intelligence Freestyle Workflow to trigger device sync
- Intelligence Freestyle Workflow to Untag Managed Apps
The end result of the solution is that any user who chooses “Cancel” will trigger a series of notifications via your tool of choice informing them why they should not choose “Cancel” and then re-triggering the notification to give them an opportunity to allow the app to be managed.
The Workspace ONE Platform includes two versions of Freestyle Workflows. One lives in UEM, the other lives in Intelligence. They share a name (yes it is confusing) but they do not work the same. A future version of the technology involves combining the two into a unified experience but for now they are separate.
In this scenario we are using Intelligence Freestyle Workflows. The vital difference to understand is that Intelligence Freestyle Workflows trigger actions to occur based on receiving a response code of 200 which means they operate in a “Fire and Forget” mode. Freestyle workflows in UEM are more flexible in that UEM Freestyle workflows can trigger based on customizable return codes or conditions, but in this case the UEM Freestyle workflows do not have access to the inventory data that is necessary to achieve our objective. The result is that we need 3 separate workflows in Intelligence to achieve our goal.
Step 1: Create Device Tags in UEM for each application
In this example the Microsoft 365 mobile apps Outlook, Excel, Powerpoint and Word are the apps that need to be managed. You can add as many apps as you want so adjust the steps below based on the apps you want to manage.
- In UEM navigate to Groups & Settings > All Settings > Devices & Users > Advanced > Tags
- Create 4 tags:
- Outlook Unmanaged
- Excel Unmanaged
- Powerpoint Unmanaged
- Word Unmanaged
Step 2: Create a Smart Group in UEM
- In UEM navigate to Groups & Settings > Groups > Assignment Groups > Select Add Smart Group
- Name the Smart Group “Unmanaged Apps”
- Scroll down to the Tags section and enter the name of each of the tags created in Step 1. The end result should look similar to:
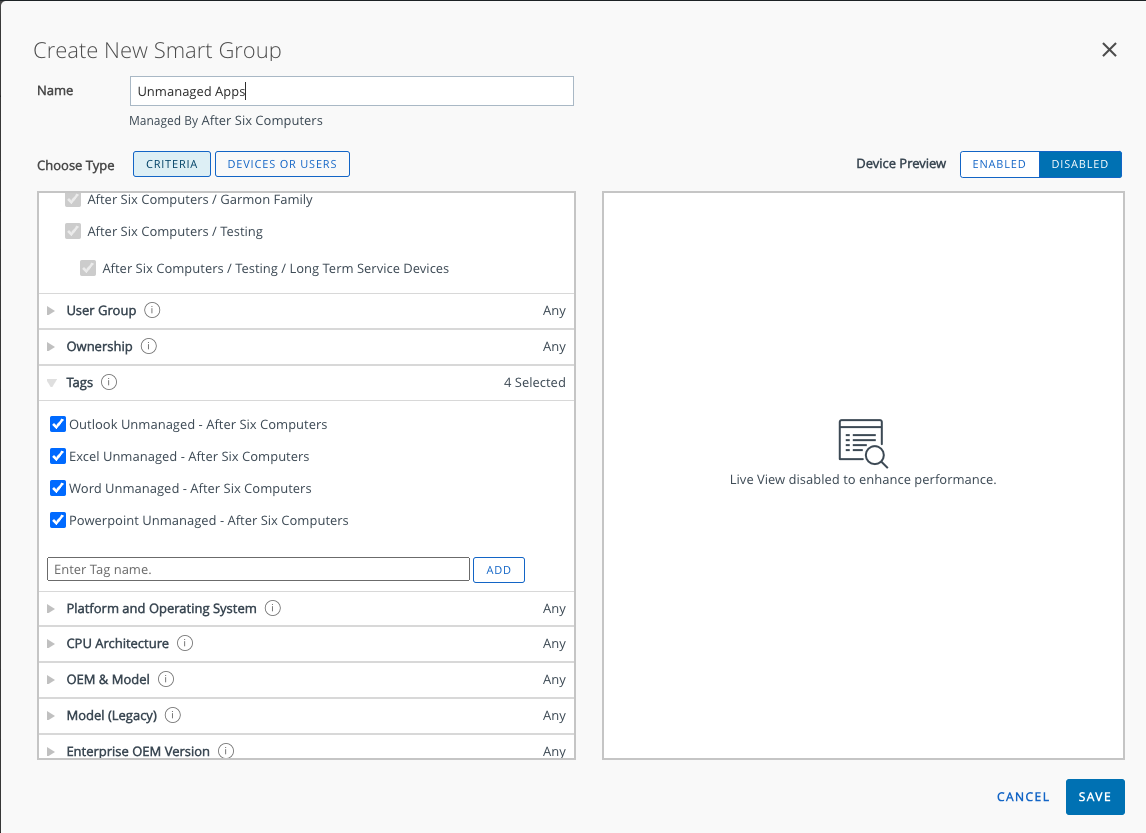
- Save the Smart Group
- Scroll down to the Tags section and enter the name of each of the tags created in Step 1. The end result should look similar to:
Step 3: Create a Device Compliance Policy in UEM
- In UEM navigate to Devices > Compliance Policy > List View > Choose Add
- Match All of the following rules
- Device Tags
- Contains Any
- Add the 4 tags created in the previous step
- The result should look like this:

- Click Next to Build the Actions
- The Actions can be whatever you need them to be, but the most important part is that the first action DOES NOT mark the device as not compliant. In the example below I’m notifying the end user first with a custom message educating them that they are receiving this because they choose Cancel, then I’m waiting 7 days before marking the device as Non-Compliant. The end goal is that at the 7 day period if the user has continued pressing “Cancel” they will have their device marked as Not Compliant which will trigger something the end user doesn’t want to happen, for example an enterprise wipe.

- Click Next to Assign the Device
- Assign the Device Policy to the Smart Group created in Step 2 named Unmanaged Apps
- Click Next to move to the Summary Tab
- Select Finish & Activate
Step 4: Create the Intelligence Freestyle Workflow Part 1 of 3
Part 1 is where Intelligence is going to identify which Microsoft 365 apps are unmanaged and then apply the corresponding UEM Device Tag to the application. For example if Outlook is unmanaged the tag Outlook Unmanaged will be applied. This is achieved using a series of IF THEN conditions in the workflow. Note that the order of how apps are input does not matter just pay attention to the device tags to make the apps match the tags. In this example I’m using 4 apps, you may have as many as you need.
- In Intelligence navigate to Freestyle and select Add Workflow
- In the top-right name the Workflow iOS App Mgmt – Part 1
- Select the Datasource Workspace ONE UEM > Devices
- Trigger Setting of Automatic
- Trigger Rules need 3 filters:
- Platform (Normalized) EQUALS Apple iOS
- Installation Status Reason EQUALS ManagementRejected
- App Name (Normalized) INCLUDES outlook, excel, word, powerpoint
- If you added more than these four apps make sure you include all of them in the filter
- The end result should look similar to this:

- Choose to + Sign below the workflow settings to add the first condition
- Rename the Condition to “Microsoft Outlook”
- The Filter is “App Name (Normalized) INCLUDES outlook”
- The end result should look like this:

- Add the first THEN Action which is to Add Tag to Device. Under the Path Variable search for existing values and type in outlook. The end result will look like this though your Tag ID will be a different value:

- Add the first ELSE Action which is going to be another Condition
- This time name the condition Microsoft Excel and the Filter will be be App Name (Normalized INCLUDES excel)
- Add the THEN Action which will be Add Tag to Device only this time you will search for Excel and use that tag
- Repeat this process for each application, the end goal looking similar to this:

- Save the Workflow.
Step 5: Create the Intelligence Freestyle Workflow Part 2 of 3
Part 2 is where Intelligence is going to trigger a UEM Sync Device command for devices that have unmanaged apps. On Apple devices the Sync Device command is what will trigger the App Management notification on the device giving the user another opportunity to accept app management.
- In Intelligence navigate to Freestyle and select Add Workflow
- In the top-right name the Workflow iOS App Mgmt – Part 2
- Data Source Workspace ONE UEM Devices Data
- Trigger Settings: SCHEDULE, Recurrence DAILY and pick a time of day where users will likely be in front of their devices, no end date
- Trigger Rules: Device Tags CONTAINS ANY OF word, excel, outlook, powerpoint
- Add Action Workspace ONE UEM > Sync Device
- The end result should look like this:

- Save the workflow.
Step 6: Create the Intelligence Freestyle Workflow Part 3 of 3
Part 3 is the cleanup phase. After the user chooses to allow management of the app it is necessary to remove the tags that were applied to the device. This workflow re-creates the logic of Part 1 only this time the action is Remove Tag and the workflow settings trigger rules begin differently.
- In Intelligence navigate to Freestyle and select Add Workflow
- In the top-right name the Workflow iOS App Mgmt – Part 3
- Data Source Workspace ONE UEM Devices Data
- Trigger Settings: Automatic
- Trigger Rules needs 3 Filters:
- Device Tags CONTAINS ANY OF outlook unamanged, word unmanaged, excel unmanged, powerpoint unmanaged
- App Name (Normalized) INCLUDES outlook, word, excel, powerpoint
- Installation Status Reason EQUALS Confirmed
- The end result should look similar to:

- Now repeat the IF THEN conditions built for Outlook, Powerpoint, Word, Excel but use the action Remove Tag. Scroll up to Step 4 if you need more detailed refresher on each filter. The end result should look similar to this:


- An optional way to end this workflow is to add the action Workspace ONE Send Email as the final THEN statement to the initial Outlook Condition. The message can inform the end user that they are now compliant. You can include this action or skip it. Due to how the Canvas is spreading out the workflow it is impossible to fit the entire flow on one screen and still be legible but this is what is looks like:

By changing from Canvas to List View it is almost possible to see all of Part 3, but I hope this gives you enough to re-create this on your own.
- Save the Workflow.
With the 6 steps now complete enable the 3 workflows and you’ll be on your way to fewer unmanaged apps in your environment.