
Updated 06/02/2025
What is Apple Platform SSO?
The Apple Platform SSO (PSSO) Framework extends the macOS login window to allow users to synchronize local account credentials with an identity provider (IdP). Management of the macOS local account credential includes support for multiple authentication methods and replaces the need for binding macOS to Microsoft Active Directory. PSSO replaces previous Apple technologies that have attempted this in the past including Apple Enterprise SSO, Apple Kerberos SSO, and Apple LDAP Bind. In some cases it even replaces Jamf Connect and Xcreds. In short:
MDM + SSO Extension + IdP Plugin + Apple macOS 13.x or higher and PSSO is enabled.
While Apple considers the feature generally available and functional, they continue to fix bugs with it with each macOS release. The IdP’s are still in active development as are the MDM’s. The point here is that despite being available from Apple for a few years now, this technology is all still a work in progress.
Okta is the only IdP that has a shipping/generally-available/not-beta/not-tech preview version of this technology. Microsoft and Omnissa are still working on their versions, with the Microsoft version available in Tech Preview and so far is the one that I see being asked about the most. I’ll cover each of these vendor methods below, but I am going to skip a lot of the background. If you want to understand PSSO in more technical detail I recommend the following one-hour introduction by Michael Epping and Mark Morowczynski:
If you want an even more in-depth understanding than this second one-hour video by Joel Rennich https://youtu.be/mkro_6BzOiY?si=ZOf5mXKMkZ8GHvqm is well worth your time.
A third one-hour deep-dive on the technology is https://youtu.be/xwgBofPoZJU?si=R1yLFU-mtMUO1suo.
PSSO is available for use as part of the macOS Login window and then used by applications for SSO. The framework supports user creation at the login window, tokens at the login window, and authorization database integration.
PSSO is NOT passwordless authentication for FileVault or macOS. Existing FIDO2 / Yubikey / Feititian / Titan users will not be replacing these methods with PSSO.
Configuration Details
The first task for the I.T. Admin is to pick one of the four IdP based user authentication options supported by PSSO. Keep in mind that none of these methods support MFA for FileVault. Your options are:
- Password and encrypted password.
In this mode the IdP uses the local account password and keeps it in sync, including password updates from the login window and screensaver unlock. One important caveot is that the IdP can NOT push password changes to the device. All password changes must be initiated from macOS. Password changes are synced at 4-hour intervals when the user is logged in. - User Secure Enclave Key.
In this mode the Secure Enclave-backed key is used to authenticate with the IdP without a password and without changing the local account password.
Things to know about this method:
There is NO password sync between the macOS local account password and the IdP password.
MFA is not available at the macOS Login screen - SmartCard.
In this mode the SmartCard is used to authenticate with the IdP. - Password with WS-Trust.
A federated IdP, meaning an IdP that facilities federated authentication across multiple security domains, can use the local account password for authentication.
Another configuration option for PSSO is the ability to create a new user at the macOS Login window. This includes the ability to add or remove users from Groups as part of the creation step. I had hoped this would allow the MDM to understand multi-user logins and adjust device registration according to who just logged in, but this is not the case so if you do enable new user creation and allow multiple users to login to the same macOS device do keep in mind MDM registration remains with the original user and MDM has no understanding of whatever new user logged into the device.
Finally the most important detail that gets overlooked about PSSO:
PSSO DOES NOT enable zero-touch onboarding.
That’s right, folks! PSSO is NOT part of Apple Business Manager Automated Enrollment (aka DEP). PSSO is turned on AFTER Setup Assistant is complete and after MDM Enrollment has finished. While PSSO is not zero-touch, there are a few tweaks to the DEP Profile I’ll show you to make the process a bit easier on your end users.
PSSO Apple macOS Device Registration Process
Here is the high level summary of what happens on the macOS device in order to enable PSSO. The most important point to understand here is that user interaction is required:
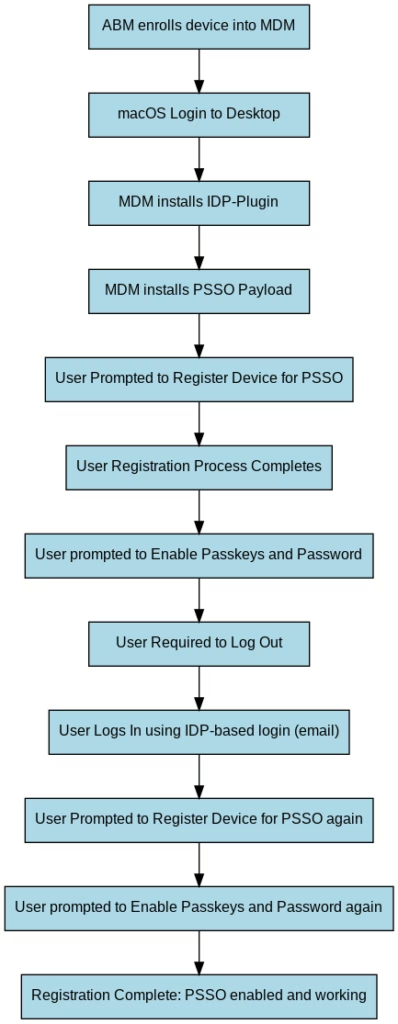
As you can see from the steps above, there are a lot of moving parts and end user prompts and a lot that can break so I wanted to share a few tips to improve your chance of success when rolling this out.
The PSSO Configuration Cheat Sheet
Pre-requisites:
I’ve had to edit this section a few times already because Omnissa continues to release broken profiles for the SSO payload. They patch one bug only to create additional ones. Originally I advised to make sure the UEM Console is updated to UEM Console 2410 Patch 9 or higher but at this point my recommendation, as of June 2nd 2025 is to not use the GUI at all and stick with building a Custom Settings Payload. This is the only method available today to ensure what you configure is installed properly on the device. I will keep revisiting this blog as the bugs are fixed.
PSSO Configuration will be slightly different depending on your IdP, but in general consists of the following steps:
- Modify Primary User in DEP Profile to include @ symbol (optional, but highly recommended)
- Add IdP-Plugin to UEM as an app and as a bootstrap package
- Configure SSO Extension Payload
- Configure Login and Background Item Payload
- Optional; Configure UEM Freestyle Orchestrator Workflow to deploy all of the required components
Note: I am not covering the Identity Provider configuration steps, which are a pre-requisite. You should consult your current IdP vendor documentation for the specific server side configurations required to enable SAML based authentication with your IdP. SAML based authentication with an IdP is a pre-requisite to everything being described i
Step 1 of 5: Modify Primary User in DEP Profile to include @ symbol
I recommend this step for all PSSO implementations.
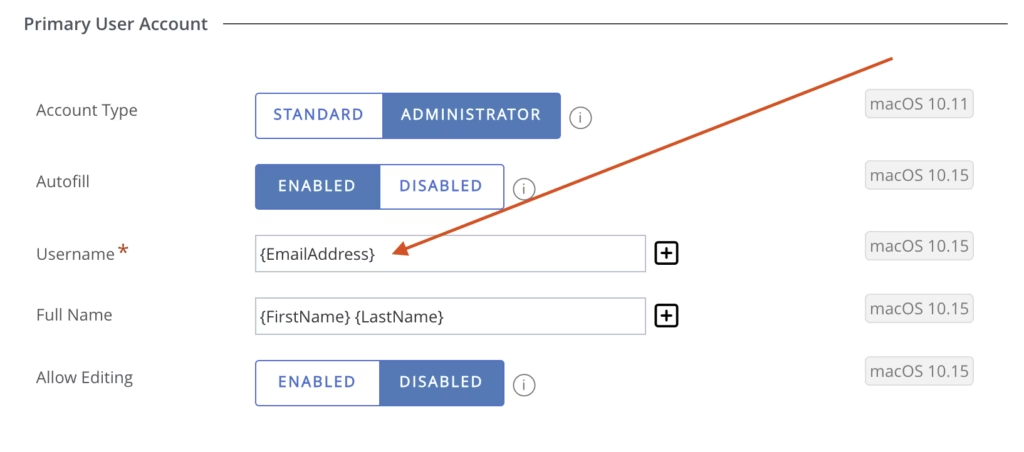
When a macOS device is at the login window, the only way for PSSO to be triggered is for the username to contain the @ symbol. During Setup Assistant you can set the Primary User Account to include the @ symbol. I suggest changing the DEP profile to make the Primary User Account Username be the email address. This will save your end user from four of the steps outlined above because it will complete the macOS Setup Assistant with a local user account that already contains the @ symbol.
To change the Primary User Account Username to be the email address, in Omnissa Workspace ONE UEM (UEM) navigate to
Groups & Settings > All Settings > Devices & Users > Apple > Device Enrollment Program (or Apple Business Manager if you have the new GUI) and edit your existing Profile then scroll all the way to the bottom to the Primary User account section.
Steps 2, 3, 4 of 5: These steps vary by the IdP but here we go:
The next steps will vary based on which IdP you are using. In general the goal is to choose the IdP-Plugin app that will be used with PSSO. The three choices are:
- PSSO with Okta Device Access using the Okta Verify App
- PSSO with Omnissa Workspace ONE Access using the Intelligent Hub App
- PSSO with Microsoft EntraID using the Microsoft Company Portal App
I recommend uploading the IdP-Plugin in to UEM as both a Bootstrap Package AND as a fully-managed App (set to Optional deployment and published via UEM Freestyle Orchestrator). Having both available ensures that the IdP-Plugin is ready to go for new devices running through Setup Assistant and for existing devices that will be available as part of a Freestyle Workflow.
Let’s dig into the 3 current IdP-Plugins, remember you are picking one of these three options:
Option 1 of 3: PSSO with Okta
For PSSO with Okta, this is the ONLY method of the three above that is considered a fully-shipping, fully supported, and fully-working configuration by each vendor involved. Okta customers will need to purchase a license to use this feature. Currently it is available through the Okta Device Access SKU which includes Okta’s Desktop MFA for macOS and Okta Desktop Password Sync. Okta has implemented Platform SSO in the Desktop Password Sync app which relies on the Okta Verify App.
If you want to learn the process I suggest spending some time reading Omnissa’s Techzone documentation which can be found here: https://techzone.omnissa.com/resource/configuring-macos-platform-sso-using-okta-and-workspace-one-uem.
As of May 19, 2025 there are some missing pieces to the Omnissa documentation so while we wait for this document to be updated, I’ve included a complete set of the four custom settings payloads that need to be deployed to implement this.
A huge thank you to Bo Leksono for helping to sort this out and come up with a working solution.
In summary, if Okta is your path forward follow Step 1 above for tweaking your ABM flow, then in UEM create four profiles, each with the custom settings payload below. You can then scroll to the bottom of this blog to the Additional Tips section below.
Payload 1 of 4:
(edit your strings according to your Okta implementation, sample data is included):
<dict>
	<key>PayloadContent</key>
	<dict>
		<key>com.okta.mobile.auth-service-extension</key>
		<dict>
			<key>Forced</key>
			<array>
				<dict>
					<key>mcx_preference_settings</key>
					<dict>
						<key>OktaVerify.OrgUrl</key>
						<string>https://acme.oktapreview.com</string>
						<key>OktaVerify.PasswordSyncClientID</key>
						<string>0asdvkgomgeTHTnf3ssg</string>
						<key>OktaVerify.UserPrincipalName</key>
						<string>{EmailAddress}</string>
                        <key>PlatformSSO.ProtocolVersion</key>
                        <string>2.0</string>
					</dict>
				</dict>
			</array>
		</dict>
	</dict>
	<key>PayloadDisplayName</key>
	<string>Custom Settings</string>
	<key>PayloadIdentifier</key>
	<string>com.okta.mobile.auth-service-extension.3A02EFFF-07A9-425A-A175-4092C3659804</string>
	<key>PayloadOrganization</key>
	<string>COMPANY</string>
	<key>PayloadType</key>
	<string>com.apple.ManagedClient.preferences</string>
	<key>PayloadUUID</key>
	<string>3A02EFFF-07A9-425A-A175-4092C3659804</string>
	<key>PayloadVersion</key>
	<integer>1</integer>
Payload 2 of 4:
(edit your strings according to your Okta implementation, sample data is included)
<dict>
	<key>PayloadContent</key>
	<dict>
		<key>com.okta.mobile</key>
		<dict>
			<key>Forced</key>
			<array>
				<dict>
					<key>mcx_preference_settings</key>
					<dict>
						<key>OktaVerify.OrgUrl</key>
						<string>https://acme.oktapreview.com</string>
						<key>OktaVerify.PasswordSyncClientID</key>
						<string>0asdvkgomgeTHTnf3ssg</string>
						<key>OktaVerify.UserPrincipalName</key>
						<string>{EmailAddress}</string>
					</dict>
				</dict>
			</array>
		</dict>
	</dict>
	<key>PayloadDisplayName</key>
	<string>Custom Settings</string>
	<key>PayloadIdentifier</key>
	<string>com.okta.mobile.E9100C26-00DD-4B27-B583-D7D14F3B0B69</string>
	<key>PayloadOrganization</key>
	<string>COMPANY</string>
	<key>PayloadType</key>
	<string>com.apple.ManagedClient.preferences</string>
	<key>PayloadUUID</key>
	<string>E9100C26-00DD-4B27-B583-D7D14F3B0B69</string>
	<key>PayloadVersion</key>
	<integer>1</integer>
</dict>
Payload 3 of 4:
(edit your strings according to your Okta implementation, sample data is included)
<dict>
	<key>Configuration</key>
	<array>
		<dict>
			<key>ApplicationIdentifier</key>
			<string>B7F62B65BN.com.okta.mobile.auth-service-extension</string>
			<key>AssociatedDomains</key>
			<array>
				<string>authsrv:acme.oktapreview.com</string>
			</array>
			<key>EnableDirectDownloads</key>
			<false/>
		</dict>
        <dict>
			<key>ApplicationIdentifier</key>
			<string>B7F62B65BN.com.okta.mobile</string>
			<key>AssociatedDomains</key>
			<array>
				<string>authsrv:acme.oktapreview.com</string>
			</array>
			<key>EnableDirectDownloads</key>
			<false/>
		</dict>
	</array>
	<key>PayloadDescription</key>
	<string>AssociatedDomainsSettings</string>
	<key>PayloadDisplayName</key>
	<string>Associated Domains</string>
	<key>PayloadIdentifier</key>
	<string>684B9C05-0A51-4837-8FC6-45990DE795FB.Associated Domains</string>
	<key>PayloadOrganization</key>
	<string></string>
	<key>PayloadType</key>
	<string>com.apple.associated-domains</string>
	<key>PayloadUUID</key>
	<string>684B9C05-0A51-4837-8FC6-45990DE795FB</string>
	<key>PayloadVersion</key>
	<integer>1</integer>
</dict>
Payload 4 of 4:
edit your strings according to your Okta implementation, sample data is included)
<dict>
        <key>PlatformSSO</key>
        <dict>
          <key>LoginFrequency</key>
          <integer>64800</integer>
          <key>AccountDisplayName</key>
          <string>Okta Platform SSO Dev</string>
          <key>AuthenticationMethod</key>
          <string>Password</string>
          <key>UseSharedDeviceKeys</key>
          <true />
        </dict>
        <key>ExtensionIdentifier</key>
        <string>com.okta.mobile.auth-service-extension</string>
        <key>Type</key>
        <string>Redirect</string>
        <key>TeamIdentifier</key>
        <string>B7F62B65BN</string>
        <key>URLs</key>
        <array>
          <string>https://acme.oktapreview.com/device-access/api/v1/nonce</string>
          <string>https://acme.oktapreview.com/oauth2/v1/token</string>
        </array>
        <key>PayloadDisplayName</key>
        <string>SSO Extension</string>
        <key>PayloadDescription</key>
        <string>SsoExtensionSettings</string>
        <key>PayloadOrganization</key>
        <string></string>
        <key>PayloadType</key>
        <string>com.apple.extensiblesso</string>
        <key>PayloadUUID</key>
        <string>3509A4EB-DE92-41FB-956E-FF2C656A51EC</string>
        <key>PayloadVersion</key>
        <integer>1</integer>
        <key>PayloadIdentifier</key>
        <string>3509A4EB-DE92-41FB-956E-FF2C656A51EC.SSO Extension</string>
      </dict>
Congratulations you are done with your Okta configuration.
Option 2 of 3: PSSO with Omnissa Workspace ONE Access
Omnissa is approaching early access for this feature but for now because the feature is in active development I’m not allowed to discuss it. Once this feature makes it to public beta I will come back and update this blog.
Unforutnately you are done (for now) with your Omnissa Workspace ONE Access configuration and need to go back to Option 1 or Option 3.
Option 3 of 3: PSSO with Microsoft EntraID
PSSO with Microsoft EntraID uses the Microsoft Company Portal App. This method has been delayed several times from going general availability by Microsoft and is currently still in Microsoft Technical Preview. There are a lot of organizations deploying it in production, some are having great success, others are struggling. It seems that each new macOS update from Apple either improves this process overall or breaks another component of it that seems to affect the Microsoft implementation the most. It does not help the situation that the Microsoft documentation is confusing.
I am excited that my colleague, Simon Elberts, blogged about the basic setup. His blog includes the bare minimum config, but there are a number of additional configuration options I recommend that are missing from his blog. I recommend heading over to his blog and using his configuration to build your template (but due to the current bugs don’t use the profile builder to build them, just jot down the settings and build a custom settings payload, then come back here for filling in some of the gaps. His blog is located here: https://blog.simonelberts.nl/2024/04/macos-platform-sso-with-workspace-one.html.
For existing devices, I recommend Freestyle Orchestrator be used to enable PSSO such that the Company Portal app is installed first, followed by the SSO Extension Profile, followed by any additional configuration profiles that I will be covering below.
Assuming you have followed Simon’s blog to complete the configuration here are the additional items I recommend implementing:
Step 1 of 5: Add Company Portal App to UEM
The first tweak to make from Simon’s blog is to make sure you have added the Microsoft Company Portal app to UEM as both a fully managed app and also as a Bootstrap package. His blog only mentions adding it as a UEM app. The Bootstrap package should be used for all new deployments, and the fully managed app should be triggered as part of a Freestyle Workflow for existing devices.
Step 2 of 5: Configure Login Item Settings
The second tweak to make from Simon’s blog is to add a new Profile in UEM (or add this to your SSO Extensions payload) and choose the Login and Background Item Payload. This eliminates one of the prompts the end user would have to click through if it is not configured. Configure the following:
Rule Type = BundleIdentifier

Rule Value = com.microsoft.CompanyPortalMac
The result should look like:

Step 3 of 5: Configure Microsoft Data Collection Policy
The third tweak is for configuring the Microsoft Company Portal App to eliminate another pesky user prompt. Out of the box the Microsoft Company Portal app will trigger a Data Collection dialog box that the user will need to read and accept. You can automate accepting these terms and skip this step by adding the following Custom Settings Payload to UEM:
<dict>
	<key>AcknowledgedDataCollectionPolicy</key>
	<string>RequiredDataOnly</string>
	<key>PayloadIdentifier</key>
        <string>com.microsoft.autoupdate2.85AEB740-4739-47F8-A0FD-F98CA4F5C6B2</string>
        <key>PayloadUUID</key>
        <string>85AEB740-4739-47F8-A0FD-F98CA4F5C6B2</string>
        <key>PayloadOrganization</key>
        <string>Workspace ONE</string>
        <key>PayloadType</key>
        <string>com.microsoft.autoupdate2</string>
        <key>PayloadVersion</key>
        <integer>1</integer>
        <key>PayloadDisplayName</key>
        <string>MSFT autoupdate</string>
        <key>PayloadDescription</key>
        <string>Settings for MSFT autoupdate</string>
</dict>
Step 4 of 5: Switch to Custom Settings Payload
Another tweak to Simon’s steps is based on the fact that the current UEM SSO Extensions Payload is still missing a number of available configuration attributes, and is currently spitting out broken XML. Simon’s blog covers the basic config for SecureEnclave configuration, but if you want to introduce a few more features to your rollout, or at the moment if you simply want the profile t o install, you’ll need to move to a Custom Settings payload in UEM.
If you are coding impaired like me, build the profile visually in a 3rd party app named iMazing Profile editor to make sure you have everything you want to configure. This app is available for download from https://imazing.com/profile-editor. The iMazing Profile editing tool includes the complete SSO Extensions payload with all of the available options and it provides detailed documentation for each available option making it much easier to understand what each options does. Best of all the output is in the proper syntax order and will deploy successfully. I wish Omnissa would buy this company and bake this tool directly into the UEM console.
The downside to this approach is that you do have to jump through a few more hoops to use the resulting configuration file in UEM. The iMazing app saves its output as a MobileConfig file. While it is possible to upload the file to UEM and deploy it as a MobileConfig file, you lose the ability to selectivity view and edit the payload if you keep it in mobileconfig format. I find it more flexible to edit the Mobileconfig XML into a compatible Custom Settings Payload then deploy the Custom Settings Payload in UEM. If you are going with Secure Based Enclave, the end result will look like the following, though if you do copy and paste my example change the PayloadUUID:
		<dict>
			<key>AuthenticationMethod</key>
			<string>UserSecureEnclaveKey</string>
			<key>ExtensionData</key>
			<dict>
                                <key>Enable_SSO_On_All_ManagedApps</key>
				<integer>1</integer>
				<key>browser_sso_disable_mfa</key>
				<integer>1</integer>
			</dict>
			<key>ExtensionIdentifier</key>
			<string>com.microsoft.CompanyPortalMac.ssoextension</string>
			<key>PayloadDisplayName</key>
			<string>Extensible Single Sign-On #1</string>
			<key>PayloadIdentifier</key>
			<string>com.apple.extensiblesso.1D5BCE27-4838-4806-8D95-8BBB736E3E10</string>
			<key>PayloadType</key>
			<string>com.apple.extensiblesso</string>
			<key>PayloadUUID</key>
			<string>1D5BCE27-4838-4806-8D95-8BBB736E3E10</string>
			<key>PayloadVersion</key>
			<integer>1</integer>
			<key>PlatformSSO</key>
			<dict>
				<key>AuthenticationMethod</key>
				<string>UserSecureEnclaveKey</string>
				<key>EnableAuthorization</key>
				<true/>
				<key>EnableCreateUserAtLogin</key>
				<true/>
				<key>NewUserAuthorizationMode</key>
				<string>Standard</string>
				<key>TokenToUserMapping</key>
				<dict>
					<key>AccountName</key>
					<string>preferred_username</string>
					<key>FullName</key>
					<string>name</string>
				</dict>
				<key>UseSharedDeviceKeys</key>
				<true/>
				<key>UserAuthorizationMode</key>
				<string>Standard</string>
			</dict>
			<key>ScreenLockedBehavior</key>
			<string>DoNotHandle</string>
			<key>TeamIdentifier</key>
			<string>UBF8T346G9</string>
			<key>Type</key>
			<string>Redirect</string>
			<key>URLs</key>
			<array>
				<string>https://login.microsoftonline.com</string>
				<string>https://login.microsoft.com</string>
				<string>https://sts.windows.net</string>
			</array>
		</dict>
Step 5 of 6: Configure Google Chrome Browser Microsoft PSSO Extension
For Google Chrome Browser users, Microsoft has published a Chrome Extension to enable PSSO within Chrome Browser. Here is a custom settings payload to enable this via Workspace ONE UEM:
<dict>
    <key>PayloadDisplayName</key>
    <string>Google Chrome Policies</string>
    <key>PayloadIdentifier</key>
    <string>com.google.Chrome.policy.forceinstall</string>
    <key>PayloadType</key>
    <string>com.google.Chrome</string>
    <key>PayloadUUID</key>
    <string>12345678-1234-1234-1234-1234567890ab</string>
    <key>PayloadVersion</key>
    <integer>1</integer>
    <key>ExtensionInstallForcelist</key>
    <array>
      <string>ppnbnpeolgkicgegkbkbjmhlideopiji;https://clients2.google.com/service/update2/crx</string>
    </array>
  </dict>
Congratulations you are done with your Microsoft PSSO configuration.
Step 5 of the original 5: Build a UEM Freestyle Workflow
UEM delivers payloads and apps in non-sequential order. For ALL IdP’s I recommend using Freestyle to sequence the order of operation. In the example below I’m illustrating the Microsoft configuration, but you can adopt this to match whichever IDP you are using. By utilizing a Workflow UEM will force sequential installation order ensuring that this solution works as advertised. In the example below I have combined the Login Item payload with the SSO payload:

Additional Tips
In order to track the rollout and success of PSSO I recommend the following UEM Sensor be deployed which allows reporting back on the status of your PSSO rollout. I found this out on the Internet somewhere and apologize for not remembering where I got it in order to credit the original author, but whoever wrote this I extend a thank you for sharing it:
#!/bin/bash

# Get the current logged-in user
currentUser=$(/usr/sbin/scutil <<< "show State:/Users/ConsoleUser" | /usr/bin/awk -F': ' '/[[:space:]]+Name[[:space:]]:/ { if ($2 != "loginwindow") { print $2 }}')

# Check if the user is valid
if [[ -z "$currentUser" ]]; then
    echo "<result>No user logged in</result>"
    exit 0
fi

# Check for Platform SSO status
pssoe_status=$(dscl . -read "/Users/$currentUser" dsAttrTypeStandard:AltSecurityIdentities 2>/dev/null | /usr/bin/awk -F'SSO:' '/PlatformSSO/ {print $2}')

# Error handling: If something goes wrong during the dscl or awk command
if [[ $? -ne 0 ]]; then
    echo "<result>Error retrieving PSSO registration</result>"
    exit 1
fi

# Determine the result based on the status
if [[ -z "$pssoe_status" ]]; then
    echo "<result>No PSSO registration found</result>"
else
    echo "<result>Yes, Entra ID account $pssoe_status registered to $currentUser</result>"
fi