
Updated 02/19/2026
Introduction
This is part three of a six part blog series on how to configure Apple Platform SSO using Omnissa Workspace ONE Unified Endpoint Management (UEM). Each part of the blog covers the various vendor configuration options and the series wraps up with a blog dedicated to troubleshooting. As each vendor continues to change their implementation these blogs will be updated.
Part 1 – What is Apple Platform SSO
Part 2 – How to configure Apple Platform SSO for Kerberos with Microsoft AD or Microsoft Entra
Part 3 – How to configure Apple Platform SSO with Microsoft EntraID
Part 4 – How to configure Apple Platform SSO with Okta Desktop Password Sync
Part 5 – How to configure Apple Platform SSO with Omnissa Access
Part 6 – Troubleshooting
Pre-Requisites for Microsoft EntraID
This blog assumes you have read and understood part one of this blog series. If you skipped part one, click the link above and come back when you have completed reading through it.
As of August 13, 2025 Microsoft officially went General Availability with support for PSSO as announced here: https://techcommunity.microsoft.com/blog/microsoft-entra-blog/now-generally-available-platform-sso-for-macos-with-microsoft-entra-id/4437424 but the support is only for macOS 13, 14, and 15. The Microsoft page speaks to future updates for macOS 26 but as of February of 2026 I’m not finding any additional documentation from Microsoft suggesting they are officially supporting any of the new features introduced back in macOS 26. To clarify you can use macOS 26 you just can’t deploy any of the new features, like Simplified Setup, that Apple introduced as part of the new OS until Microsoft updates the Microsoft Intune Company Portal App and possibly some of their backend infrastructure.
With regards to the UEM Console versions required to configure this functionality, the SSO Extension payload is what needs to configured. It’s been included as a profile since UEM Console 2506, but if you use the UEM Profile builder I wish you luck. It’s been buggy, full of logic errors, and overall has been broken / patched / broken again over the last three major UEM console releases and too many hotfixes to document here. I continue to recommend NOT using the profile builder, but instead build the entire profile outside of UEM using a 3rd party app that you can download for free named iMazing Profile Editor. I provide the technical details on that down below. If you use UEM Custom Settings it doesn’t matter what build or hotfix the UEM Server is on, this configuration will work properly.
In case you are not following this blog in order, a reminder that if your organization will continue to have Active Directory and EntraID, be sure to go back to part two and review that blog if you need to implement the Kerberos configuration.
Recommended Configuration Summary
By the end of this blog you will complete the following configuration steps:
- Optional: Modify the macOS Primary User in DEP Profile to include @ symbol
- Add the Microsoft Intune Company Portal app to Workspace ONE UEM as an app
- Configure the SSO Extension Payload (Custom Settings recommended)
- Configure a Login and Background Item Payload
- Configure a Data Collection Policy
- Optional: Configure Google Chrome’s Microsoft PSSO Add On
- Configure UEM Freestyle Orchestrator Workflow to deploy all of the required components in the proper order
- Optional: Deploy a UEM Sensor to track progress
Step 1 of 9: This step is optional! Modify the Primary User in the Automated Device Enrollment configuration to include the @ symbol

This step is optional, but recommended until Simplified Setup is supported and then this step will be revisited.
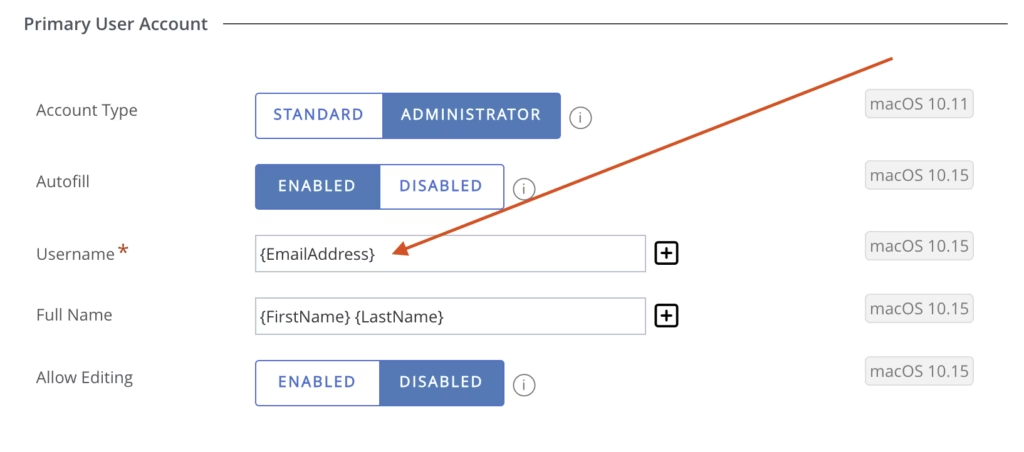
Remember the Triforce from Part 1? Each of the three user accounts can have a unique name and a unique password, or you could standardize the username format to be the email address across all three. Think about it: your IDP already uses email address for the user name. If you are using (or going to use) Apple Managed Accounts the account will be using the email address, so why not use the email address as the local macOS user name as well? This change can be configured in the Automated Device Enrollment profile.
If you need PSSO to trigger from the macOS Login window, the username being typed in must include an @ symbol. If you do not require PSSO at the macOS Login window and will only be using PSSO for post login related authentication this change is not required.
In the Workspace ONE UEM Console, to change the Primary User Account Username to be the email address, navigate to
Groups & Settings > All Settings > Devices & Users > Apple > Automated Device Enrollment > and edit your existing Profile > Scroll all the way to the bottom of the profile to the Primary User account section and update the Username to the {EmailAddress} variable.
Step 2 of 9: Add the Microsoft Intune Company Portal app to UEM
The Microsoft Intune Company Portal App (ICP) must be installed on macOS to enable PSSO. Prior versions of this blog suggested deploying ICP as a bootstrap package but it was discovered that installing ICP as a bootstrap app breaks Microsoft’s Conditional Access functionality. The new recommendation is to use a UEM Freestyle Workflow to sequence the installation of ICP along with the other PSSO configuration items. The recommended steps are:
- Download the latest version of the Microsoft Company Portal App from https://go.microsoft.com/fwlink/?linkid=853070
- Run the app through the Workspace ONE UEM Admin Assistant Tool.
- Add the Microsoft Company Portal app to Workspace ONE UEM as a fully managed app. Assign this app to a Smart Group that targets all macOS device but change the assignment from Auto to Manual.
- After building the remaining PSSO Profile configurations, a Freestyle Workflow will be created to install ICP on devices that require PSSO.
Step 3 of 9: Building a PSSO Configuration
Before being able to create the UEM Console Profile to deploy the PSSO configuration you must first determine how you want PSSO to be configured. The next step in this blog will cover what you do with the configuration after you have made these decisions.
First decide if you are choosing Secure Enclave or Password Sync for your configuration. Microsoft is advocating Secure Enclave is the way to go, but many organizations don’t want to give up password sync between the local macOS account and the directory, so they are going with the Password configuration. For both methods, there are dozens of configuration options to choose from when configuring the SSO Extension. Each setting has security implications for an environment that must be considered before deploying these payloads. Discuss these settings in detail with your security team to ensure security compliance with your specific device configuration requirements.
This blog is not going to explain or recommend every PSSO setting needed for your organization, but it will cover the basics. Below you will find two known good working sample configurations: one for Secure Enclave and a second for Password Sync. The sample configurations below are based on Microsoft’s published reference guide which can be found here: https://learn.microsoft.com/en-us/intune/intune-service/configuration/platform-sso-macos. The samples are functional, but require a few edits before deploying them. Configuration items and settings included in the samples are examples and are NOT meant to convey best practices.
Ready to configure some payloads? Great. Normally this is the point where you would open up the UEM console, choose New Profile, and start selecting check boxes in the GUI. But the current UEM Profile builder is not cut out for complex Payloads like this one where there are a lot of “If you choose option A, you need to add Option B”. Maybe one day that will change but for now just don’t do it. Instead, download and install the iMazing Profile editor from https://imazing.com/profile-editor and use iMazing Profile editor to construct a valid known good working payload using the guidance that follows.
Install iMazing > Open the app > check for Manifest Updates to ensure you have the latest version of the payload installed > Create a new Profile > Scroll Down to the “Extensible Single Sign-On” payload.
In the iMazing app, the ? icon following each of the profile names links to Apple’s developer documentation for the feature along with a great community notes section with recommendations for many of the settings. Fields include sample formatting to help ensure you type in the correct syntax and the menu options available within the builder change based on which type of SSO you are configuring. All of this makes for a much better learning environment than the mostly static profile builder that UEM offers.
As iMazing as the tool is (pun intended), there are still some details you have to know before being able to create the payload which will be discussed in the next few paragraphs.
The first thing to understand is the Extension Identifier. Back in part two of this blog the Extension identifier com.apple.AppSSOKerberos.KerberosExtension is used to configure the Kerberos payload so it can be ignored here. The com.microsoft.azureauthenticator.ssoextension is for Apple iOS/iPadOS where the Microsoft Authenticator App is responsible for enabling PSSO. The iOS/iPadOS configuration is not covered in this blog series. Microsoft did not create an Authenticator App for macOS, instead they choose to add the SSO Extensions to the Microsoft Intune Company Portal app for macOS. As a result com.microsoft.CompanyPortalMac.ssoextension is what you want to choose for building the PSSO payload.

Type is Redirect. The only time it would be Credential is if you are following part two of this blog and you configured Kerberos.
The Team Identifier comes from the IDP. For the Microsoft Intune Company Portal App this would be UBF8T346G9.
The URLs section are defined by the IDP and determine which identity providers that do SSO app extensions. In the examples below it includes the essentials for Microsoft EntraID, but if your Microsoft environment needs to also allow sovereign cloud domains, like Azure Government or Azure China 21Vianet, then also add the following URL (and include the ones already in the existing sample below):
https://login.partner.microsoftonline.cn
https://login.chinacloudapi.cn
https://login.microsoftonline.us
https://login-us.microsoftonline.com
The rest of the keys are well documented within the iMazing tool.
After completing the payload configuration in iMazing, save the configuration which will save the configuration as a MobileConfig File.
Now the bad news:
While it is possible to upload and deploy a mobileconfig file using UEM, doing so prevents editing the settings directly within the UEM console. I can’t stress enough that SSO payloads are the most frustrating payloads I’ve ever worked with in UEM and you will need to tweak them a lot during the initial build process. I recommend that you manually edit the MobileConfig File from iMazing, strip out the XML so that it becomes compatible with the Workspace ONE UEM Custom Settings Payload. There’s some black magic to this editing, so to help out with this, two samples are included below.
Sample Custom Settings for PSSO with Secure Enclave
Probably the most important detail about the XML structure of the SSO Extension payload is understanding the specific order of the keys. The payload is broken into two main sections:
The first section beginning at <key>ExtensionData</key> is how the 3rd party IDP plugin app interacts with the SSO Extension.
The second section of the XML begins with <key><ExtensionIdentifier</key> and is where the vendor agnostic configuration items go. These are made available by Apple.
Each IDP can create additional strings for use within the <key>ExtensionData</key> section of the payload. For example Microsoft supports an optional <key>enable_se_key_biometric_policy</key><true/> setting that forces TouchID to be enabled before PSSO can be enabled on the device. That key is not included in UEM’s profile builder, it is not included in the iMazing Profile editor, and it is not included in the sample below. To add the key it belongs in the <key>ExtensionData</key> section because the key is specific to Microsoft’s implementation of the SSO Extension.
Another source of frustration/confusion is that not all of the Apple provided keys in the <key><ExtensionIdentifier</key> are supported by the 3rd party vendors. For example the Simplified Setup keys belong in the <key><ExtensionIdentifier</key> section, but they are not yet supported by anyone other than Okta. Another example is that Microsoft does not support adding the Groups or Group Members keys.
The omission of keys can also be detrimental. This blog was updated in February of 2026 after discovering that the sample payload was previously missing the key>ExistingUserAuthorizationMode</key>. This is now included below, but without this key being present, any local macOS accounts that exist on the device prior to enabling the payload will automatically revert from Admin to Standard accounts.
The bottom line is that this payload requires meticulous planning before rolling into production.
To help get started, here’s a sample that configures the Secure Enclave:
If you do copy and paste the example below change the PayloadUUID that is highlighted in red below. You can use https://www.uuidgenerator.net to create a new UUID.
		<dict>
			<key>AuthenticationMethod</key>
			<string>UserSecureEnclaveKey</string>
			<key>ExtensionData</key>
			<dict>
                                <key>Enable_SSO_On_All_ManagedApps</key>
				<integer>1</integer>
				<key>browser_sso_disable_mfa</key>
				<integer>1</integer>
			</dict>
			<key>ExtensionIdentifier</key>
			<string>com.microsoft.CompanyPortalMac.ssoextension</string>
			<key>PayloadDisplayName</key>
			<string>Extensible Single Sign-On #1</string>
			<key>PayloadIdentifier</key>
			<string>com.apple.extensiblesso.1D5BCE27-4838-4806-8D95-8BBB736E3E10</string>
			<key>PayloadType</key>
			<string>com.apple.extensiblesso</string>
			<key>PayloadUUID</key>
			<string>1D5BCE27-4838-4806-8D95-8BBB736E3E10</string>
			<key>PayloadVersion</key>
			<integer>1</integer>
			<key>PlatformSSO</key>
			<dict>
				<key>AuthenticationMethod</key>
				<string>UserSecureEnclaveKey</string>
				<key>EnableAuthorization</key>
				<true/>
				<key>EnableCreateUserAtLogin</key>
				<true/>
				<key>NewUserAuthorizationMode</key>
				<string>Standard</string>
                                <key>ExistingUserAuthorizationMode</key>
				<string>Admin</string>
				<key>TokenToUserMapping</key>
				<dict>
					<key>AccountName</key>
					<string>preferred_username</string>
					<key>FullName</key>
					<string>name</string>
				</dict>
				<key>UseSharedDeviceKeys</key>
				<true/>
				<key>UserAuthorizationMode</key>
				<string>Standard</string>
			</dict>
			<key>ScreenLockedBehavior</key>
			<string>DoNotHandle</string>
			<key>TeamIdentifier</key>
			<string>UBF8T346G9</string>
			<key>Type</key>
			<string>Redirect</string>
			<key>URLs</key>
			<array>
				<string>https://login.microsoftonline.com</string>
				<string>https://login.microsoft.com</string>
				<string>https://sts.windows.net</string>
			</array>
		</dict>
Sample Custom Settings for PSSO with Password Sync
Probably the most important detail about the XML structure of the SSO Extension payload is understanding the specific order of the keys. The payload is broken into two main sections. The first section beginning at <key>ExtensionData</key> is how the 3rd party IDP plugin app interacts with the SSO Extension. Each IDP can create additional strings for use within this section of the payload. For example Microsoft supports an optional <key>enable_se_key_biometric_policy</key><true/> setting that forces TouchID before PSSO will function. That key is not included in UEM’s profile builder, it is not included in the iMazing Profile editor, and it is not included in the sample below. If you wanted to add it to your configuration, you would need to know where in the XML to place the key. The answer is inside the <key>ExtensionData</key> section because the key is specific to Microsoft’s implementation of the SSO Extension.
The second section of the XML begins with <key<ExtensionIdentifier</key> and is where the vendor agnostic configuration items go. These are made available by Apple. The confusion customers often report is that not all of the Apple keys are supported by the 3rd party vendors. We’ve already referenced Simplified Setup is one of the keys that falls under this section of the payload but is not going to function with Microsoft Intune or UEM until product updates are finished by each vendor. There are other examples as well, for example Microsoft does not support adding Groups or Group Members.
If you do copy and paste the example below change the PayloadUUID that is highlighted in red below. You can use https://www.uuidgenerator.net to create a new UUID. Other sections highlighted in red need to be edited as well. Explanations below the sample.
			<dict>
			<key>AuthenticationMethod</key>
			<string>Password</string>
			<key>ExtensionData</key>
			<dict>
				<key>AppPrefixAllowList</key>
				<string>com.microsoft</string>
				<key>Enable_SSO_On_All_ManagedApps</key>
				<integer>1</integer>
				<key>browser_sso_disable_mfa</key>
				<integer>1</integer>
			</dict>
			<key>ExtensionIdentifier</key>
			<string>com.microsoft.CompanyPortalMac.ssoextension</string>
			<key>PayloadDisplayName</key>
			<string>Extensible Single Sign-On</string>
			<key>PayloadIdentifier</key>
			<string>com.apple.extensiblesso.C4963821-B65C-4ABB-8247-77ECC3B1C09D</string>
			<key>PayloadType</key>
			<string>com.apple.extensiblesso</string>
			<key>PayloadUUID</key>
			<string>C4963821-B65C-4ABB-8247-77ECC3B1C09D</string>
			<key>PayloadVersion</key>
			<integer>1</integer>
			<key>PlatformSSO</key>
			<dict>
				<key>AccountDisplayName</key>
				<string>AFTERSIXCOMPUTERS</string>
				<key>AdditionalGroups</key>
				<array>
					<string>NOT_SUPPORTED_BY_MICROSOFT</string>
				</array>
				<key>AdministratorGroups</key>
				<array>
					<string>NOT_SUPPORTED_BY_MICROSOFT</string>
				</array>
				<key>AllowDeviceIdentifiersInAttestation</key>
				<true/>
				<key>AuthenticationGracePeriod</key>
				<integer>6400</integer>
				<key>AuthenticationMethod</key>
				<string>Password</string>
				<key>EnableAuthorization</key>
				<true/>
				<key>EnableCreateUserAtLogin</key>
				<true/>
				<key>EnableRegistrationDuringSetup</key>
				<false/>
				<key>FileVaultPolicy</key>
				<array>
					<string>RequireAuthentication</string>
					<string>AllowOfflineGracePeriod</string>
					<string>AllowAuthenticationGracePeriod</string>
				</array>
				<key>LoginFrequency</key>
				<integer>64800</integer>
				<key>LoginPolicy</key>
				<array>
					<string>RequireAuthentication</string>
					<string>AllowOfflineGracePeriod</string>
					<string>AllowAuthenticationGracePeriod</string>
				</array>
				<key>NewUserAuthenticationMethods</key>
				<array>
					<string>Password</string>
				</array>
				<key>NewUserAuthorizationMode</key>
				<string>Standard</string>
				<key>NonPlatformSSOAccounts</key>
				<array>
					<string>ASADMIN</string>
				</array>
				<key>OfflineGracePeriod</key>
				<integer>6400</integer>
				<key>SynchronizeProfilePicture</key>
				<true/>
				<key>TemporarySessionQuickLogin</key>
				<true/>
				<key>UnlockPolicy</key>
				<array>
					<string>AllowTouchIDOrWatchForUnlock</string>
					<string>RequireAuthentication</string>
					<string>AllowOfflineGracePeriod</string>
					<string>AllowAuthenticationGracePeriod</string>
				</array>
				<key>UseSharedDeviceKeys</key>
				<true/>
				<key>UserAuthorizationMode</key>
				<string>Standard</string>
			</dict>
			<key>TeamIdentifier</key>
			<string>UBF8T346G9</string>
			<key>Type</key>
			<string>Redirect</string>
			<key>URLs</key>
			<array>
				<string>https://login.microsoftonline.com</string>
				<string>https://login.microsoft.com</string>
				<string>https://sts.windows.net</string>
			</array>
		</dict>
The AccountDisplayName is the name is shown in notifications and authentication requests. Edit this before using.
AdditionalGroups and AdministratorGroups. Apple enabled the SSO Extension to add users to local macOS groups which is achieved by the strings included in the sample. Microsoft did not implement support for this feature so they will not work when Microsoft is the IDP. We all hope this is a roadmap item for Microsoft.
EnableRegistrationDuringSetup is the macOS 26 Simplified Setup String. It is set to False in this example because Workspace ONE UEM currently does not support the feature. When UEM is updated to support this feature flip the flag to true. You may wish to remove this key entirely from the payload for now.
Step 4 of 9: Create a PSSO Configuration Profile in UEM
Using the configuration created in the previous step, you will now create a new Profile in UEM with three payloads: Custom Settings, System Extension, and Login Items.
Custom Settings Payload:
Open the UEM Console > Choose Add Profile > Apple macOS > Management Type Imperative, Context Device > Custom Settings > and paste in your code as illustrated in the screenshot below.

Warning: If you are ignoring my advice to use the UEM Console Custom Settings Payload and are moving forward with the UEM Profile builder GUI, be aware that within the SSO Extension Profile builder at the bottom is a Custom XML section as seen in the screenshot below.

The Custom XML block is meant to include only additional XML that is part of Apple’s SSO Extension Data Dictionary. This GUI does NOT add information to the <key>ExtensionData</key>. This blog is meant to only add keys that are defined by Apple that are not already in the GUI. In the following step five and step six of this blog there are additional custom settings recommended to be created, but these upcoming configurations do NOT get configured inside the Custom XML box. Only use the Custom XML section of the SSO Extension payload if there is an Apple provided key specific to the SSO Extension that you do not find available in the profile builder GUI. In other words, don’t add the Microsoft Data Collection Policy or the Google Extensions to the SSO Extension Custom XML section.
System Extension Payload:
Update: As of February 2026 with the release of macOS 26.3 reports are suggesting that this payload is no longer required. Further testing is ongoing.
Add a second payload type named System Extension with the following configuration:
Under Allowed System Extension Types add an entry for Team Identifier UBF8T346G9
Under Allowed System Extensions add an entry for Team Identifier UBF8T346G9
Note the payload builder will automatically add blank lines for every other entry in this payload. You will need to manually delete each of the others before the profile can be saved.

Login Item Payload:
When the Microsoft Intune Company Portal app is first installed on macOS it will prompt the user with a dialog box to allow it to run background items. This is unnecessary and can be skipped by configuring a Login and Background Item Payload. You can either create a brand new payload in UEM and only deploy the Login and Background Item Payload, or you can add the payload to the existing Custom Settings payload you built in Step 1. I prefer bundling the two into a single UEM Profile as follows:
In the UEM Console edit the PSSO Profile you created in Step 3. Scroll down to the “Login and Background Items” section of the payload builder and choose ADD. Configure the payload as follows:
Rule Type = BundleIdentifier

Rule Value = com.microsoft.CompanyPortalMac
The result should look like:

Now that the three payloads: Custom Settings, System Extension, and Login Item have been added to the single profile, click Next to advance to the Assignment portion of UEM.
Assign the payload to a SmartGroup targeting macOS devices.
DO NOT set the profile deployment to AUTO. Set the profile to Manual.
DO NOT display the payload in the App Catalog. The deployment of this payload will be handled in a Freestyle Workflow detailed later in this blog.
Step 5 of 9: Configure Microsoft Data Collection Policy
Another prompt from the Microsoft Intune Company Portal app will be displayed after installation if you do not configure the Data Collection Policy. End users hate prompts! Eliminate this one by creating a new Profile in UEM as follows:
Open the UEM Console > Choose Add Profile > Apple macOS > Management Type Imperative, Context Device > Custom Settings > Add the code below:
<dict>
	<key>AcknowledgedDataCollectionPolicy</key>
	<string>RequiredDataOnly</string>
	<key>PayloadIdentifier</key>
        <string>com.microsoft.autoupdate2.85AEB740-4739-47F8-A0FD-F98CA4F5C6B2</string>
        <key>PayloadUUID</key>
        <string>85AEB740-4739-47F8-A0FD-F98CA4F5C6B2</string>
        <key>PayloadOrganization</key>
        <string>Workspace ONE</string>
        <key>PayloadType</key>
        <string>com.microsoft.autoupdate2</string>
        <key>PayloadVersion</key>
        <integer>1</integer>
        <key>PayloadDisplayName</key>
        <string>MSFT autoupdate</string>
        <key>PayloadDescription</key>
        <string>Settings for MSFT autoupdate</string>
</dict>
Assign the payload to a SmartGroup targeting macOS devices. DO NOT set the profile to AUTO. Set the profile to Manual. Do not display the payload in the App Catalog. The deployment of this payload will be handled in a Freestyle Workflow detailed later in this blog.
Step 6 of 9: Configure Google Chrome Browser Microsoft PSSO Extension
Apple’s PSSO plugin natively supports the macOS Safari web browser but will not work with 3rd party browsers like Google Chrome until a vendor created Plugin/Extension is installed on the device. To solve for this Microsoft has published a Google Chrome Browser Extension to enable PSSO within the Google Chrome Browser. If your organization deploys Google Chrome Browser than this is a must have step:
Open the UEM Console > Choose Add Profile > Apple macOS > Management Type Imperative, Context Device > Custom Settings > Add the code below:
<dict>
    <key>PayloadDisplayName</key>
    <string>Google Chrome Policies</string>
    <key>PayloadIdentifier</key>
    <string>com.google.Chrome.policy.forceinstall</string>
    <key>PayloadType</key>
    <string>com.google.Chrome</string>
    <key>PayloadUUID</key>
    <string>12345678-1234-1234-1234-1234567890ab</string>
    <key>PayloadVersion</key>
    <integer>1</integer>
    <key>ExtensionInstallForcelist</key>
    <array>
      <string>ppnbnpeolgkicgegkbkbjmhlideopiji;https://clients2.google.com/service/update2/crx</string>
    </array>
  </dict>
Assign the payload to a SmartGroup targeting macOS devices. DO NOT set the profile to AUTO. Set the profile to Manual. Do not display the payload in the App Catalog. The deployment of this payload will be handled in a Freestyle Workflow detailed later in this blog.
Step 7 of 9: Build a UEM Freestyle Workflow to Deploy PSSO
UEM delivers payloads and apps in non-sequential order. PSSO requires installation in a specific order of operation to function. By utilizing a UEM Workflow it will force sequential installation order ensuring that this solution works as advertised. Here is a sample Workflow to deploy PSSO:

Create the Workflow using the Platform macOS, use a Smart Group targeting macOS and set Deployment to “Show in Intelligent Hub” while testing, or after you know everything works, “Auto Deploy and Show in Intelligent Hub.” Give the Workflow a name, I’m using “Apple Platform SSO” and then upload a fancy icon.
Step 1: Add Step > Condition > Application does not exist > Application name Equals “Company Portal” (no quotes) and Application Version Less then or equal to 5.2510.1.0. The THEN action is Install Application and the app is the Microsoft Intune Company Portal. The Version should be set to “latest available” as this app will be updated more often then you might think. Adjust the Additional Settings > Error Handling to reduce the Timeout down to 20 minutes, Retry After 5 minutes with a Maximum Retry of 1. When Retries are Exhausted Stop Workflow.
The second THEN action is to install the profile for Private Data logging.
Add an Else to the condition to handle bypassing the install if the correct version is already installed.
Step 2: Add Step > Action Install Profile > Select the PSSO profile created
Step 3 Add Step > Condition > Application does not exist > Application Name equals “Google Chrome” (no quotes) and Application Version Less than 143.0.7499.41. The THEN action is Install Application and the app is Google Chrome. The Version should be set to “latest available” as this app since Google updates Chrome every 30 minutes (only joking, slightly). Adjust the Additional Settings > Error Handling to reduce the Timeout down to 20 minutes, Retry After 5 minutes with a Maximum Retry of 1. When Retries are Exhausted Stop Workflow. The second THEN action is Install Profile choosing the Chrome Browser PSSO profile created previously.
Add an Else to handle devices that already have Chrome installed and the first action under Else is to install the Chrome Browser Plugin.
The end result will be a new item in the Workspace ONE UEM Hub App Catalog named “Apple PSSO” that can be selected on the device for installation.
Step 8 of 9: This step is optional! Deploy a UEM Sensor to track status
While optional, I think this is a useful step to complete.
In order to track the rollout and success of PSSO I recommend the following UEM Sensor be deployed which allows reporting back on the status of your PSSO rollout. I found this recommended out on the Internet somewhere and apologize for not remembering where I got it in order to credit the original author, but whoever wrote this I extend a thank you for sharing it:
#!/bin/bash

# Get the current logged-in user
currentUser=$(/usr/sbin/scutil <<< "show State:/Users/ConsoleUser" | /usr/bin/awk -F': ' '/[[:space:]]+Name[[:space:]]:/ { if ($2 != "loginwindow") { print $2 }}')

# Check if the user is valid
if [[ -z "$currentUser" ]]; then
    echo "<result>No user logged in</result>"
    exit 0
fi

# Check for Platform SSO status
pssoe_status=$(dscl . -read "/Users/$currentUser" dsAttrTypeStandard:AltSecurityIdentities 2>/dev/null | /usr/bin/awk -F'SSO:' '/PlatformSSO/ {print $2}')

# Error handling: If something goes wrong during the dscl or awk command
if [[ $? -ne 0 ]]; then
    echo "<result>Error retrieving PSSO registration</result>"
    exit 1
fi

# Determine the result based on the status
if [[ -z "$pssoe_status" ]]; then
    echo "<result>No PSSO registration found</result>"
else
    echo "<result>Yes, Entra ID account $pssoe_status registered to $currentUser</result>"
fi
Step 9 of 9: Configure Intelligent Hub for macOS 25.11
!!!!! This step only applies to organizations that use Microsoft Conditional Access with the Intune Company Portal App.
In December of 2025 Omnissa released Hub for macOS 25.11 which is the first release to include support for using PSSO with Access. This release also fixes a problem with registering macOS devices for use with Microsoft Conditional Access. This now means there are two SSO Extension apps on the same macOS device: the Hub app and the Microsoft Intune Company Portal App.
Open the UEM Console > Choose Add Profile > Apple macOS > Management Type Imperative, Context Device > Custom Settings > Add the code below:
<dict>
    <key>FeatureFlags</key>
    <dict>
        <key>MacOSConditionalAccessUsingCompanyPortalFeatureFlag</key>
        <true/>
    </dict>
    <key>PayloadDisplayName</key>
    <string>Intelligent Hub</string>
    <key>PayloadIdentifier</key>
    <string>Omnissa.4cbaf201-d741-44c6-889c-efb283df4ae9.HubSettings.93f1655a-59fb-42dc-bc31-9571275cb12b</string>
    <key>PayloadOrganization</key>
    <string></string>
    <key>PayloadType</key>
    <string>com.ws1.hub.mac</string>
    <key>PayloadUUID</key>
    <string>1D7F0D17-369B-4766-9CA0-D2B4537657C1</string>
    <key>PayloadVersion</key>
    <integer>1</integer>
</dict>
Be sure to adjust your freestyle workflow above to include this payload if it will apply to your environment.
In the acknowledgement section below there is a link to the Omnissa documentation that includes a Best Practices chart that details each of the various scenarios customers might find themselves in based on where they are with their Microsoft Conditional Access implementation.
Acknowledgments
My colleague, Simon Elberts, blogged about this topic over at https://blog.simonelberts.nl/2024/04/macos-platform-sso-with-workspace-one.html. A huge thank you to Simon for his work on this subject.
My colleague Michael Bradley continues to be the front-man for the official documentation on Omnissa’s tech zone. A huge thank you to him for his continued edits to those documents. For more of the Omnissa official documentation on this subject be sure to check out:
https://docs.omnissa.com/bundle/macOS-Device-ManagementVSaaS/page/PSSOEntra.html
https://docs.omnissa.com/bundle/macOS-Device-ManagementVSaaS/page/PSSOEntra.html#best_practices
Next Steps
With the configuration out of the way the next step would be to review Part 6 for some tips on troubleshooting.
Part 1 – What is Apple Platform SSO
Part 2 – How to configure Apple Platform SSO for Kerberos with Microsoft AD or Microsoft Entra
Part 3 – How to configure Apple Platform SSO with Microsoft EntraID
Part 4 – How to configure Apple Platform SSO with Okta Desktop Password Sync
Part 5 – How to configure Apple Platform SSO with Omnissa Access
Part 6 – Troubleshooting
5 thoughts on “How to Configure Apple Platform SSO with Microsoft EntraID”